Assignment 3 Report:A Simple CUDA Renderer
Assignment 3 要求我们写三个 CUDA 程序:SAXPY 热身(5 pts)、并行 prefix-sum + find_repeats(10 pts)、以及一个正确且尽可能快的 CUDA 圆渲染器(85 pts)。课程要求跑在 NVIDIA T4 上(compute capability 7.5)。
本机为 macOS、无 NVIDIA GPU,所有编译与运行均通过 Google Colab CLI 租用的 Tesla T4 VM 完成。下文每一步都给出实际执行的命令,输出: 处的代码块为对应命令在 VM 上的真实运行结果。
0. 环境配置
0.1 方案选择:Colab CLI + Tesla T4(替代官方 AWS 方案)
官方 cloud_readme.md 推荐在 AWS 的 g5g.xlarge(T4G)上跑。本方案改用 Colab CLI 的 Tesla T4(x86_64):同为 T4 一代、compute capability 同为 7.5,与课程 README 指定的硬件规格一致;CUDA 工具链(nvcc 12.8)由 Colab 镜像预装。
- 本机:macOS(x86_64),无 GPU,不装 CUDA 工具链。
- 远端:Colab CLI 起的临时 VM(Ubuntu 22.04,自带 CUDA 12.8 + Tesla T4 15 GB)。
- 费用提醒:Colab session 创建起每秒都在消耗 compute units(idle 也扣),24 小时强制回收,用完必须
colab stop。
0.2 本机:colab CLI 与 ADC 认证
本机已安装 google-colab-cli v0.6.0(~/.local/bin/colab)。认证采用 ADC(Application Default Credentials):配置一次长期有效,必须显式携带 Colab 后来端要求的 colaboratory scope,否则 401/403。
gcloud auth application-default login \
  --scopes=openid,\
https://www.googleapis.com/auth/cloud-platform,\
https://www.googleapis.com/auth/userinfo.email,\
https://www.googleapis.com/auth/colaboratory
验证:
colab --auth=adc whoami
输出:
Auth provider: adc
Email:         xxxxxy@gmail.com
Audience:      xxxxxx
Expires in:    59m
Scopes:
  - email
  - https://www.googleapis.com/auth/cloud-platform
  - https://www.googleapis.com/auth/colaboratory
  - https://www.googleapis.com/auth/userinfo.email
  - openid
本机踩坑:shell 环境存在代理变量 http_proxy=http://127.0.0.1:7897(https_proxy、all_proxy 同理)。colab CLI 的 Python/urllib3 栈走该代理时与 Google 的 TLS 握手被中断(SSLEOFError),表现为 ADC 凭证刷新失败;gcloud(Go 栈)不受影响。执行任何 colab 命令前需清空代理变量:
unset http_proxy https_proxy all_proxy HTTP_PROXY HTTPS_PROXY ALL_PROXY
0.3 起 T4 session
colab --auth=adc new -s asst3 --gpu T4
colab --auth=adc status -s asst3
输出:
[asst3] gpu-t4-s-kkb-usw4a0-xjwl8ks9ag1c | Hardware: T4 | Variant: GPU | Status: IDLE
注意:
--gpu拼写必须准确(T4),未识别的值会静默 fallback 到 A100 并失败。每次会话都要给-s起名字,否则随机 hex 名很难对账。
0.4 VM 上验证 GPU 与 CUDA
echo "nvidia-smi && which nvcc && nvcc --version | tail -2 && cat /etc/os-release | head -1" | colab --auth=adc console -s asst3
输出:
/content# nvidia-smi && which nvcc && nvcc --version | tail -2 && cat /etc/os-release | head -1
Tue Sep  1 04:59:09 2026
+-----------------------------------------------------------------------------------------+
| NVIDIA-SMI 580.82.07              Driver Version: 580.82.07      CUDA Version: 13.0     |
+-----------------------------------------+------------------------+----------------------+
| GPU  Name                 Persistence-M | Bus-Id          Disp.A | Volatile Uncorr. ECC |
| Fan  Temp   Perf          Pwr:Usage/Cap |           Memory-Usage | GPU-Util  Compute M. |
|                                         |                        |               MIG M. |
|=========================================+========================+======================|
|   0  Tesla T4                       Off |   00000000:00:04.0 Off |                    0 |
| N/A   37C    P8             13W /   70W |       0MiB /  15360MiB |      0%      Default |
|                                         |                        |                  N/A |
+-----------------------------------------+------------------------+----------------------+

+-----------------------------------------------------------------------------------------+
| Processes:                                                                              |
|  GPU   GI   CI              PID   Type   Process name                        GPU Memory |
|        ID   ID                                                               Usage      |
|=========================================================================================|
|  No running processes found                                                             |
+-----------------------------------------------------------------------------------------+
/usr/local/cuda/bin/nvcc
Cuda compilation tools, release 12.8, V12.8.93
Build cuda_12.8.r12.8/compiler.35583870_0
PRETTY_NAME="Ubuntu 22.04.5 LTS"
/content# exit
logout

[0] 0:bash*                                                                                 "03b68099fcce" 04:59 01-Sep-26
[exited]

Connection closed.
nvidia-smi:Tesla T4、Driver580.82.07、CUDA Version13.0、0MiB / 15360MiBnvcc:/usr/local/cuda/bin/nvcc,Cuda compilation tools, release 12.8, V12.8.93- 系统:
PRETTY_NAME="Ubuntu 22.04.5 LTS"
console 管道喂命令跑完即退(stdin EOF → logout),属预期;残留终端控制序列无害。
0.5 上传 asst3 代码到 VM
cd /Users/wu000376/Github/Stanford-cs149
tar czf /tmp/asst3.tar.gz asst3
colab --auth=adc upload -s asst3 /tmp/asst3.tar.gz /content/asst3.tar.gz
echo "cd /content && tar xzf asst3.tar.gz && ls asst3" | colab --auth=adc console -s asst3
0.6 依赖:freeglut3-dev(render 需要)
render 的 main.cpp #include <GL/glut.h>(来自 freeglut3-dev),Makefile 链接 -lGL -lglut -lcudart。官方 cloud_readme 要求安装:
echo "sudo apt-get update && sudo apt-get install -y freeglut3-dev" | colab --auth=adc console -s asst3
(在重置/新开 VM 上若未安装,setup_env.sh 也会自动安装,见 §0.7b。)
0.7 编译与跑通三部分
saxpy:
echo "cd /content/asst3/saxpy && make && ./cudaSaxpy" | colab --auth=adc console -s asst3
scan:
echo "cd /content/asst3/scan && make && ./cudaScan -n 1000000" | colab --auth=adc console -s asst3
输出:
render(cpuref 参考实现跑通,输出 PPM 文件):
echo "cd /content/asst3/render && make && ./render -r cpuref rgb && ls output_0000.ppm" | colab --auth=adc console -s asst3
交互显示(
-i)需要 X11 转发,headless 下不用;文件输出模式(默认/-f)即可。
0.7a 参考二进制(cudaScan_ref)的兼容性修复
仓库预编译的参考二进制 cudaScan_ref(aarch64)与 cudaScan_ref_x86(x86-64)在 Colab VM 上无法直接运行——它们是在比 colab VM 更新的工具链上编译的:
$ ./cudaScan_ref_x86 -m scan -i random -n 1000000
./cudaScan_ref_x86: /lib/x86_64-linux-gnu/libstdc++.so.6: version `GLIBCXX_3.4.32' not found (required by ./cudaScan_ref_x86)
./cudaScan_ref_x86: /lib/x86_64-linux-gnu/libc.so.6: version `GLIBC_2.38' not found (required by ./cudaScan_ref_x86)
VM 是 Ubuntu 22.04(glibc 2.35、gcc-11 的 libstdc++),而参考解需要 GLIBC_2.38 和 GLIBCXX_3.4.32(gcc-13+,Ubuntu 24.04 noble 才提供)。checker.py 拿不到参考解的运行时间(Ref Time: None),无法生成 Score Table。
修复思路:不升级 VM 系统库(避免破坏 22.04 环境),而是从 Ubuntu 24.04 (noble) 官方源提取 libc6、libstdc++6、libgcc-s1 三个包解压到独立目录 /opt/noble,用 noble 的动态链接器显式启动参考二进制:
# 1) 从 noble 源下载并解压三个基础库到 /opt/noble
cd /tmp && rm -rf noblepkgs /opt/noble && mkdir -p noblepkgs && cd noblepkgs
curl -s http://archive.ubuntu.com/ubuntu/dists/noble/main/binary-amd64/Packages.gz -o P.gz
zcat P.gz | awk 'BEGIN{split("libc6 libstdc++6 libgcc-s1",a," "); for(i in a) w[a[i]]=1} $1=="Package:"&&$2 in w{pkg=$2} $1=="Filename:"&&pkg{print "http://archive.ubuntu.com/ubuntu/"$2; pkg=""}' > urls.txt
while read u; do wget -q "$u"; done < urls.txt
mkdir -p /opt/noble
for f in *.deb; do dpkg-deb -x "$f" /opt/noble; done

# 2) 用 noble loader + 正确库路径启动参考解(还需真驱动库目录 /usr/lib64-nvidia)
/opt/noble/usr/lib/x86_64-linux-gnu/ld-linux-x86-64.so.2 \
  --library-path /opt/noble/usr/lib/x86_64-linux-gnu:/usr/lib64-nvidia:/usr/local/cuda/lib64 \
  ./cudaScan_ref_x86 -m scan -i random -n 1000000
输出:
---------------------------------------------------------
Found 1 CUDA devices
Device 0: Tesla T4
   SMs:        40
   Global mem: 14913 MB
   CUDA Cap:   7.5
---------------------------------------------------------
Array size: 1000000
Student GPU time: 0.546 ms
Scan outputs are correct!
调试过程中发现并解决的三个库问题:
① GLIBC/GLIBCXX 版本不足(noble 库解决);
② 参考解动态加载 libcuda.so.1 失败(code=35 driver insufficient)——需把真驱动库目录 /usr/lib64-nvidia 加入库搜索路径,而不是用 CUDA toolkit 自带的各种 stub;
③ 最终库路径顺序为 noble 库 → nvidia 驱动库 → CUDA toolkit 库。
总结
为让 checker.py(内部直接调用 ./cudaScan_ref_x86)透明工作,参考二进制的全部适配(noble sysroot、libglut 软链、ref wrapper)统一由仓库根目录幂等脚本 asst3/setup_env.sh 完成(详见 §0.7b):它把 cudaScan_ref* / render_ref* 原 ELF 改名保留为 *.real,在原位置生成同名 bash wrapper(内部用 noble loader + 正确 LD_LIBRARY_PATH 启动)。
colab内执行一次即可:
cd /content/asst3 && bash setup_env.sh
之后 ./checker.py scan / ./checker.py find_repeats 即可正常调用参考解生成 Score Table。
0.7b Colab headless 构建:绕过 GL 链接问题
直接编译报错:
/content/asst3/render# cd /content/asst3/render && make
mkdir -p objs/
g++ -m64 main.cpp -O3 -Wall -g -c -o objs/main.o
g++ -m64 display.cpp -O3 -Wall -g -c -o objs/display.o
nvcc benchmark.cu -O3 -m64 -c -o objs/benchmark.o
nvcc warning : Support for offline compilation for architectures prior to '<compute/sm/lto>_75' will be removed in a future release (Use -Wno-deprecated-gpu-targets to suppress warning).
g++ -m64 refRenderer.cpp -O3 -Wall -g -c -o objs/refRenderer.o
nvcc cudaRenderer.cu -O3 -m64 -c -o objs/cudaRenderer.o
nvcc warning : Support for offline compilation for architectures prior to '<compute/sm/lto>_75' will be removed in a future release (Use -Wno-deprecated-gpu-targets to suppress warning).
g++ -m64 noise.cpp -O3 -Wall -g -c -o objs/noise.o
g++ -m64 ppm.cpp -O3 -Wall -g -c -o objs/ppm.o
g++ -m64 sceneLoader.cpp -O3 -Wall -g -c -o objs/sceneLoader.o
g++ -m64 -O3 -Wall -g -o render objs/main.o objs/display.o objs/benchmark.o objs/refRenderer.o objs/cudaRenderer.o objs/noise.o objs/ppm.o objs/sceneLoader.o -L/usr/local/cuda/lib64/ -lcudart -lGL -lglut -lcudart
/usr/bin/ld: /usr/lib/gcc/x86_64-linux-gnu/11/../../../x86_64-linux-gnu/libGL.so: undefined reference to `_glapi_tls_Current'
collect2: error: ld returned 1 exit status
make: *** [Makefile:64: render] Error 1
所有源码(含新增的 cudaRenderer.cu)编译都过了!最后链接错误:
/usr/bin/ld: libGL.so: undefined reference to `_glapi_tls_Current'
这是经典的 OpenGL(Mesa)链接问题 _glapi_tls_Current undefined——通常是 libglvnd 与系统 Mesa 的 libGL 冲突,或缺 libgl1-mesa-dev/libglvnd-dev。GPU 云镜像一般带 Mesa 但可能缺 glvnd 开发库。修复(装 Mesa/glvnd 开发包并重链):
sudo apt-get install -y libgl1-mesa-dev libglvnd-dev
但是colab环境里装上了还是不行。
render 的 Makefile 链接 -lGL -lglut,而 Colab VM 的 Mesa 组件版本撕裂导致链接失败:
libGL.so.1(来自libgl1-mesa-glx23.0.4)引用了旧版符号_glapi_tls_Current- 系统
libglapi.so(Mesa 23.2.1,来自 graphics-drivers/ubuntugis PPA 混源)早已改用新符号名_glapi_tls_Dispatch/_glapi_tls_Context - 两个库版本不一致 →
undefined reference to _glapi_tls_Current,重装/升级libgl1-mesa-glx(官方源只有 23.0.4)无法解决
作业的 正确性检查(-c)与 checker.py 都是 headless(只有 -i 交互模式才用 glut 窗口),因此可以在 Colab 上用去掉 GL 的链接方式构建 render(课程 Makefile 与源码全部不动)。这一步与参考二进制的兼容适配(§0.7a)统一由仓库根目录的一键脚本 asst3/setup_env.sh 完成(幂等,可反复执行),其职责依次为:
- 构建 noble sysroot(/opt/noble):从 Ubuntu 24.04 源提取
libc6/libstdc++6/libgcc-s1解包(scan/render 参考二进制都需要 GLIBC_2.38/GLIBCXX_3.4.32,见 §0.7a); - libglut.so.3.12 软链:
render_ref需要该 soname(VM freeglut 为 .so.3.9.0,ABI 兼容); - 缺
<GL/glut.h>→ 自动apt-get install freeglut3-dev(§0.6 手动安装因此可选); - 若目标文件缺失 → 内部执行
make:其 GL 链接步骤必失败但属预期,脚本吞掉该失败继续(所有.o已在链接前产出); - headless
render构建:生成 stub(glutInit/startRendererWithDisplay空定义)→ 去 GL 链接生成render; - ref wrapper:把
cudaScan_ref*/render_ref*改名保留为*.real,生成同名 bash 启动器(noble loader +LD_LIBRARY_PATH=/opt/noble/usr/lib/x86_64-linux-gnu:/usr/lib64-nvidia:/usr/local/cuda/lib64)使 checker 能取到 Ref Time。
# 进入 vm,一键配置全部环境(幂等)
colab --auth adc console -s asst3
cd /content/asst3 && bash setup_env.sh
其中 headless 构建手工等价命令(stub + 去 GL 链接):
# 1) stub:提供 main.cpp 引用的两个符号的空定义(headless 不调用)
mkdir -p /tmp/stub && cat > /tmp/stub/stub.cpp <<'EOF'
#include "circleRenderer.h"
extern "C" {
void glutInit(int* argcp, char** argv) {}
}
void startRendererWithDisplay(CircleRenderer* renderer) {}
EOF
g++ -m64 -O3 -Wall -g -c /tmp/stub/stub.cpp -I. -o /tmp/stub/stub.o
# 2) 链接:排除 display.o、不连 -lGL -lglut
g++ -m64 -O3 -Wall -g -o render objs/main.o objs/benchmark.o objs/refRenderer.o objs/cudaRenderer.o objs/noise.o objs/ppm.o objs/sceneLoader.o /tmp/stub/stub.o -L/usr/local/cuda/lib64/ -lcudart
要点:
main.cpp在交互分支直接调用glutInit,故 stub 里必须用extern "C"给出空定义(glut.h 声明是 C 链接)。- 该构建只用于 Colab 本地跑
-c/checker收集数据;提交时 grader 使用原 Makefile 和其自带环境,无影响。 - 若重跑
make会恢复原 Makefile 行为(GL 链接失败),改完源码想重新链接时执行bash setup_env.sh(或手动 make 看预期错误后重跑脚本)。
0.8 checker 评分
- scan 部分:
./checker.py scan与./checker.py find_repeats - render 部分:
./checker.py(对 8 个场景跑正确性 + 性能评分)
环境说明:checker 的 Ref Time 来自预编译参考二进制(cudaScan_ref_x86 / render_ref_x86)。它们是在比 VM 更新的工具链上编译的,需在 VM 上先完成三类适配——统一交给一键脚本 asst3/setup_env.sh(幂等,合并了 noble 库、libglut 软链、headless render 构建、ref wrapper 四项,见 §0.7a/0.7b):
- GLIBC/GLIBCXX:ref 需要
GLIBC_2.38/GLIBCXX_3.4.32(Ubuntu 24.04 noble)→setup_env.sh从 noble 源提取libc6/libstdc++6/libgcc-s1解包到/opt/noble; - libglut.so.3.12:
render_ref_x86需要该 soname,VM freeglut 是.so.3.9.0(ABI 兼容)→ 脚本建软链; - wrapper 启动:脚本把
cudaScan_ref*/render_ref*改名保留为*.real,生成同名 bash 启动器(用 noble 动态链接器 +LD_LIBRARY_PATH=/opt/noble/usr/lib/x86_64-linux-gnu:/usr/lib64-nvidia:/usr/local/cuda/lib64启动),使 checker 能拿到 Ref Time。
# 进入 vm,一键配置环境(幂等,可反复执行)
colab --auth adc console -s asst3
cd /content/asst3 && bash setup_env.sh

# 跑评分
cd /content/asst3/scan   && ./checker.py scan && ./checker.py find_repeats
cd /content/asst3/render && ./checker.py
若 wrapper 报
Permission denied,补可执行位后重跑:chmod +x cudaScan_ref cudaScan_ref_x86 render_ref render_ref_x86;wrapper 是脚本,依赖可执行位。
0.9 收尾:务必 stop(必须遵守)
Colab session 一直烧 compute units,用完/当天结束时必须退出:
colab --auth=adc stop -s asst3
colab --auth=adc sessions    # 确认输出 "No active sessions found"
输出:
(opencode) opencode % colab --auth=adc stop -s asst3
[colab] Stopping session 'asst3'...
[colab] Session terminated.

(opencode) Stanford-cs149 [main●●] % colab --auth adc sessions
[colab] No active sessions found on server.
用 Colab CLI 用完必须
colab --auth adc stop退出,防止孤儿 session 隔夜烧光额度。
1. Part 1: CUDA Warm-Up 1: SAXPY(5 pts)
1.1 实现描述
补全 saxpy/saxpy.cu 中的 saxpyCuda。完整流程:
- 分配显存:
cudaMalloc三个 device 缓冲区device_x / device_y / device_result,各sizeof(float) * N字节。按 assignment 要求,X、Y、result 三个宿主数组都要上传 GPU(result 虽会被 kernel 全覆盖写入,本次仍按题面拷贝,其对带宽测量的影响在 Q2 讨论)。 - 上传输入:三个
cudaMemcpy(..., cudaMemcpyHostToDevice)。H2D 的cudaMemcpy在本用法下是同步调用(返回即拷贝完成),不需要额外的cudaDeviceSynchronize()。 - 整体计时:starter 原有的
startTime/endTime包住「上传 + kernel + 拷回」全过程,语义不变。 - kernel 独立计时:新增第二组计时器,只包住 kernel 启动。关键点:kernel 启动对 CPU 是异步的,不加同步直接读钟只会测到 API 调用开销(微秒级假象)。启动后调用
cudaDeviceSynchronize(),阻塞直到 GPU 上所有先前工作完成,再读取结束时间。 - 拷回结果:
cudaMemcpy(resultarray, device_result, ..., cudaMemcpyDeviceToHost)。D2H 的cudaMemcpy不拷完不返回,整体计时终点天然覆盖拷回,无需再同步。 - 释放显存:
cudaFree三个缓冲区。
输出保留 starter 原有的整体带宽行(Effective BW by CUDA saxpy,有效流量固定为 totalBytes = 3N * sizeof(float)、分母为整体时长),并新增 Kernel-only time (excl. memcpy) 行(同流量口径、分母为纯 kernel 时长),供两组数据对比。
1.2 运行与计时结果
# 打包代码
cd ~/Stanford-cs149
tar czf /tmp/asst3.tar.gz asst3

# 开session
colab --auth=adc new -s asst3 --gpu T4
colab --auth=adc status -s asst3

# 0.5 上传代码(saxpy 已改,传本地版)
colab --auth=adc upload -s asst3 /tmp/asst3.tar.gz /content/asst3.tar.gz
echo "cd /content && tar xzf asst3.tar.gz && ls asst3" | colab --auth=adc console -s asst3

# 1.2 编译并运行 SAXPY(报告 1.2 的输出贴这里)
echo "cd /content/asst3/saxpy && make && ./cudaSaxpy" | colab --auth=adc console -s asst3
这里直接使用
colab --auth adc console -s asst3
直接进入远端 VM 的 原生 bash,再编译运行。
输出:
/content# cd /content && tar xzf asst3.tar.gz && ls asst3
cloud_readme.md  create_submission.sh  handout  README.md  render  saxpy  scan

/content# cd /content/asst3/saxpy && make && ./cudaSaxpy
mkdir -p objs/
g++ -m64 main.cpp -O3 -Wall -c -o objs/main.o
nvcc saxpy.cu -O3 -m64 -c -o objs/saxpy.o
nvcc warning : Support for offline compilation for architectures prior to '<compute/sm/lto>_75' will be removed in a future release (Use -Wno-deprecated-gpu-targets to suppress warning).
g++ -m64 -O3 -Wall -o cudaSaxpy objs/main.o  objs/saxpy.o -L/usr/local/cuda/lib64/ -lcudart
---------------------------------------------------------
Found 1 CUDA devices
Device 0: Tesla T4
   SMs:        40
   Global mem: 14913 MB
   CUDA Cap:   7.5
---------------------------------------------------------
Running 3 timing tests:
Effective BW by CUDA saxpy: 491.792 ms          [2.272 GB/s]
Kernel-only time (excl. memcpy): 116.384 ms     [9.603 GB/s]
Effective BW by CUDA saxpy: 362.719 ms          [3.081 GB/s]
Kernel-only time (excl. memcpy): 4.597 ms       [243.105 GB/s]
Effective BW by CUDA saxpy: 367.641 ms          [3.040 GB/s]
Kernel-only time (excl. memcpy): 4.689 ms       [238.352 GB/s]
程序默认 N = 100M;printCudaInfo 先打印设备信息,随后 3 轮计时,每轮打印整体与 kernel-only 两行。
数据解读:第 1 轮是冷启动异常值——首次 CUDA 调用包含 context 创建、驱动/内核模块加载、首次 cudaMalloc 等一次性开销,kernel-only 高达 116 ms(第 2、3 轮仅 ~4.6 ms)。后续两轮稳定,分析以第 2、3 轮为准:
| 指标 | 第 2 轮 | 第 3 轮 | 平均 |
|---|---|---|---|
| 整体(含拷贝) | 362.719 ms / 3.081 GB/s | 367.641 ms / 3.040 GB/s | 365.2 ms / 3.06 GB/s |
| kernel-only | 4.597 ms / 243.105 GB/s | 4.689 ms / 238.352 GB/s | 4.64 ms / 240.7 GB/s |
注:程序内
GBPerSec以 1024³ 为除数,打印值是 GiB/s(十进制约 ×1.074)。
1.3 Question 1:与 CPU 串行实现对比
对比对象是 Assignment 1 Program 5 的 SAXPY(asst1 报告实测数据、同口径带宽):
| 实现 | 带宽(GiB/s) |
|---|---|
| CPU ISPC(单核) | 22.46 |
| CPU ISPC + tasks(8 核) | 24.82 |
| CPU ISPC + streaming store(asst1 最优) | 26.71 |
| CUDA kernel-only(T4) | ~240.7 |
(asst1 报告以 Task 3 优化后重测的数据为准:单核 22.461、task 24.823、streaming store 26.713 GiB/s。)
结论:CUDA kernel 的纯计算带宽约为 asst1 中 CPU 最优实现(26.71 GiB/s)的 ~9 倍,比单核 ISPC 高 ~10.7 倍。原因在于 CPU 版被共享内存带宽卡死(本机多核并行只把带宽从 22.46 提到 24.82 GiB/s,streaming store 也仅到 26.71 GiB/s),而 T4 的 GDDR6 显存带宽比 CPU 内存带宽高一个数量级。但若比较整体时间(含 PCIe 数据传输),CUDA 版反而慢得多——这正是 Q2 的核心。
1.4 Question 2:两组计时差异与带宽一致性
N = 100M 时各环节流量与理论带宽:
| 环节 | 流量 | 通道 | 理论峰值 |
|---|---|---|---|
| 上传 x + y + result | 3 × 400 MB = 1.2 GB | PCIe 3.0 x16 | ≈ 15.8 GB/s(单向) |
| 拷回 result | 400 MB | PCIe 3.0 x16 | 同上 |
| kernel 读写 | 读 800 MB + 写 400 MB = 1.2 GB | T4 GDDR6 | 320 GB/s(官方 datasheet) |
两组计时的差异:稳定态整体 ~365 ms vs kernel-only ~4.64 ms,相差 ~79 倍——整体耗时中约 98.7% 花在数据搬运(上传 + 拷回),kernel 实际计算只占 ~1.3%。
整体计时窗口(startTime 在三次 H2D 上传之前,endTime 在 D2H 拷回之后)完整覆盖全部搬运:上传 x + y + result 共 1.2 GB,拷回 result 0.4 GB,合计 1.6 GB 真实 PCIe 流量。但 GBPerSec 的分子 totalBytes 固定取 3N(1.2 GB,即"读 x + 读 y + 写 result"的有效流量口径),小于窗口内真实搬运的 1.6 GB——分子少算了 result 的 D2H 拷回流量。因此打印的 3.06 GB/s = 1.2 GB ÷ 365 ms 低估了真实 PCIe 吞吐:实际 PCIe 吞吐 = 1.6 GB ÷ ~365 ms ≈ 4.4 GB/s。
带宽一致性:
- kernel-only ~240.7 GiB/s(≈ 258 GB/s):约为 T4 官方显存带宽 320 GB/s 的 81%。对 memory-bound 的 saxpy,读写混合 + GDDR6 效率 + ECC 开销下达到 80% 量级峰值利用率属典型水平,与机器规格基本一致。
- 整体对应 PCIe ~4.4 GB/s:远低于 PCIe 3.0 x16 单向理论 15.8 GB/s,但与 README 给出的 AWS 参考值 5.3 GB/s 同量级(Colab 环境略低)。差距来源与 README 的分析一致:
- 宿主内存未用 pinned memory(页锁定内存):普通 pageable 内存需先由驱动拷入固定的 pinned 暂存区再 DMA,多一次拷贝且无法全速 DMA;
- 主板芯片组与虚拟机(Colab 共享基础设施)的额外开销。
- 首轮冷启动:CUDA context/驱动初始化的一次性开销使首轮 kernel 计时虚高 25 倍,分析取稳定轮次数值。
上传 result 的影响:本次按题面把 result 也上传(PCIe 流量 1.6 GB);若省略该次拷贝(kernel 全覆盖写 result,算法上不必要),PCIe 流量降为 1.2 GB,整体带宽口径数值会进一步上升。两种做法在固定 totalBytes 口径下可直接比较。
2. Part 2: CUDA Warm-Up 2: Parallel Prefix-Sum
2.1 算法思想:exclusive scan(Blelloch 树)
实现目标:给定数组 A,对每个位置 i 输出 A[0..i-1] 的元素和(不含 A[i])。采用课程讲的 upsweep(reduce)/ downsweep(scatter)两阶段树算法,把串行迭代版 exclusive_scan_iterative 直接移植到 CUDA。
前置约定:输入/输出数组以 2 的幂大小分配(cudaScan 用 nextPow2 补齐),扫描写在 result 上也可以(cudaScan 预先把 input 拷进 result,但 README 要求 exclusive_scan 自己负责把 input 拷到 result,我按后者实现,保证调用自洽)。exclusive_scan 接收的是 device 内存指针,是跑在 CPU 上的 host 函数,需多次 launch kernel。
算法步骤(对应 README 伪代码,每步一个 kernel launch 层):
- 准备:
cudaMemcpy把input拷入result(D2D),并把补零到 2 的幂的尾部cudaMemset清零。尾部清零是必要的——正是因为可以假设数组为 2 的幂,扫描算法会在 padding 区域也读写,不初始化会引入垃圾值。 - Upsweep(自底向上归约):对每个跨度
2*twod(twod = 1, 2, 4, ..., P2/2),并行把左半段总和加到右半段末:result[i+2*twod-1] += result[i+twod-1]。对内层循环并行,每一层只启动P2/(2*twod)个线程(恰好对应每层跨度数),不启动全 N 个线程再用条件判断跳过——这正是 README 强调的避免低效的关键。 - 置根为 0:把数组最后一个元素(此刻是全体元素和)置 0,把 inclusive 和变为 exclusive 和。
- Downsweep(自顶向下scatter):对每个跨度
2*twod(twod = P2/2, ..., 2, 1),并行交换左右半段末值并累加:t = result[i+twod-1]; result[i+twod-1] = result[i+2*twod-1]; result[i+2*twod-1] += t。同样每层只启动P2/(2*twod)个线程。
find_repeats(用 scan 做"压缩"):
- 标记:算
flag[i] = (A[i] == A[i+1]) ? 1 : 0(kernel,一个线程一个元素)。 - exclusive scan:对
flag做 exclusive scan,得到offset[i]= "在i之前有多少个重复下标"——这恰好就是该下标如果命中所应写入output的位置(这就是数据并行压缩的核心:用 scan 把"哪些位置要写"变成"写到第几个空位")。 - scatter:
if (flag[i] == 1) output[offset[i]] = i(kernel,互不冲突因为 offset 互不相同)。 - 返回值 = 重复总数 =
offset[length-1](因为最后一个元素没有i+1,flag[length-1]恒为 0,所以 exclusive scan 的最后一项正是全 1 的个数)。
完整例子:A = {1, 2, 2, 1, 1, 1, 3, 5, 3, 3}(length = 10,README 例题)。
Step 1——标记:逐对比较 A[i] == A[i+1],flag[i] = 1 表示"下标 i 是一个重复对的起点":
| i | 0 | 1 | 2 | 3 | 4 | 5 | 6 | 7 | 8 | 9 |
|---|---|---|---|---|---|---|---|---|---|---|
| A[i] | 1 | 2 | 2 | 1 | 1 | 1 | 3 | 5 | 3 | 3 |
| A[i+1] | 2 | 2 | 1 | 1 | 1 | 3 | 5 | 3 | 3 | — |
| 相等? | ✗ | ✓ | ✗ | ✓ | ✓ | ✗ | ✗ | ✗ | ✓ | — |
| flag[i] | 0 | 1 | 0 | 1 | 1 | 0 | 0 | 0 | 1 | 0 |
(i=9 无 A[10],恒 0。)共 4 个重复起点:{1, 3, 4, 8}。
Step 2——exclusive scan:offset[i] = flag[0] + flag[1] + ... + flag[i-1](不含自身)。物理意义:扫到下标 i 时,前面已经发现了多少个重复起点,也就是"如果我 i 是重复起点,我该排到输出数组的第几个空位":
| i | 0 | 1 | 2 | 3 | 4 | 5 | 6 | 7 | 8 | 9 |
|---|---|---|---|---|---|---|---|---|---|---|
| flag[i] | 0 | 1 | 0 | 1 | 1 | 0 | 0 | 0 | 1 | 0 |
| offset[i] | 0 | 0 | 1 | 1 | 2 | 3 | 3 | 3 | 3 | 4 |
逐项核对:offset[4]=2 = 前 4 个 flag 的和 0+1+0+1;offset[9]=4 = 全部 10 个 flag 之和(因为 exclusive 不含 flag[9] 本身,而 flag[9]=0)——所以 offset[length-1] = 4 就是总重复数,直接作为返回值。
Step 3——scatter:并行地对每个 flag[i]==1 的元素执行 output[offset[i]] = i:
| flag[i]==1 的 i | offset[i] | 写入 |
|---|---|---|
| 1 | 0 | output[0] = 1 |
| 3 | 1 | output[1] = 3 |
| 4 | 2 | output[2] = 4 |
| 8 | 3 | output[3] = 8 |
结果:output = {1, 3, 4, 8},返回 4 —— 与 README 例题输出完全一致 ✓。
三步全程无锁、无冲突:scan 保证每个下标拿到互不相同的空位号(offset 单调不减),散射写位置两两不同,天然可并行。
2.2 实现说明(scan/scan.cu)
- 新增 5 个 device kernel:
scan_upsweep_kernel、scan_downsweep_kernel、scan_zero_kernel、find_repeats_mark_kernel、find_repeats_write_kernel。 - 实现
exclusive_scan:按上述 4 步,每层 launch 一个 kernel(upsweep/downsweep 各log2(P2)次 + root 清零 1 次)。 - 实现
find_repeats:标记 kernel + 一次exclusive_scan+scatter kernel + 拷回计数。 - 所有 starter 原有代码(TODO 注释、
cudaScan/cudaScanThrust/printCudaInfo等)原样保留。
2.3 执行与验证
正确性由 main.cpp 内建校验判定:cudaScan 与 CPU 串行版逐元素对比(Error: Device exclusive_scan outputs incorrect result. A[i] = ..., expecting ... 即出错,无错误输出即为正确);find_repeats 对比 cpu_find_repeats 的结果序列。
# 打包最新代码上传
cd /Users/wu000376/Github/Stanford-cs149
tar czf /tmp/asst3.tar.gz asst3

colab --auth=adc upload -s asst3 /tmp/asst3.tar.gz /content/asst3.tar.gz

# 进入vm
colab --auth adc console -s asst3
cd /content && tar xzf asst3.tar.gz

# 编译 + 默认 scan 测试(随机输入,N=64)
cd /content/asst3/scan && make && ./cudaScan

# find_repeats 测试
cd /content/asst3/scan && ./cudaScan -m find_repeats

# 大规模 + ones 输入调试
cd /content/asst3/scan && ./cudaScan -m scan -i ones -n 1000000 && ./cudaScan -m find_repeats -i ones -n 1000000
输出:
(opencode) Stanford-cs149 [main●] % colab --auth adc console -s asst3
/content# cd /content && tar xzf asst3.tar.gz

/content# cd /content/asst3/scan && make && ./cudaScan
mkdir -p objs/
g++ -m64 main.cpp -O3 -Wall -c -o objs/main.o
nvcc scan.cu -O3 -m64 -c -o objs/scan.o
nvcc warning : Support for offline compilation for architectures prior to '<compute/sm/lto>_75' will be removed in a future release (Use -Wno-deprecated-gpu-targets to suppress warning).
g++ -m64 -O3 -Wall -o cudaScan objs/main.o  objs/scan.o -L/usr/local/cuda/lib64/ -lcudart
---------------------------------------------------------
Found 1 CUDA devices
Device 0: Tesla T4
   SMs:        40
   Global mem: 14913 MB
   CUDA Cap:   7.5
---------------------------------------------------------
Array size: 64
Student GPU time: 0.062 ms
Scan outputs are correct!

/content/asst3/scan# cd /content/asst3/scan && ./cudaScan -m find_repeats
---------------------------------------------------------
Found 1 CUDA devices
Device 0: Tesla T4
   SMs:        40
   Global mem: 14913 MB
   CUDA Cap:   7.5
---------------------------------------------------------
Array size: 64
Student GPU time: 0.086 ms
Find_repeats outputs are correct!

/content/asst3/scan# cd /content/asst3/scan && ./cudaScan -m scan -i ones -n 1000000 && ./cudaScan -m find_repeats -i ones -n 1000000
---------------------------------------------------------
Found 1 CUDA devices
Device 0: Tesla T4
   SMs:        40
   Global mem: 14913 MB
   CUDA Cap:   7.5
---------------------------------------------------------
Array size: 1000000
Student GPU time: 0.397 ms
Scan outputs are correct!
---------------------------------------------------------
Found 1 CUDA devices
Device 0: Tesla T4
   SMs:        40
   Global mem: 14913 MB
   CUDA Cap:   7.5
---------------------------------------------------------
Array size: 1000000
Student GPU time: 0.782 ms
Find_repeats outputs are correct!
2.4 checker 评分
正确性 + 与参考解 cudaScan_ref/cudaScan_ref_x86 的性能对比(Score Table,Element Count 1M–40M,满分 5(perf_points=1.25 × 4 档)):
cd /content/asst3/scan && chmod +x cudaScan_ref_x86 cudaScan_ref && ./checker.py scan && ./checker.py find_repeats
输出:
/content/asst3/scan# cd /content/asst3/scan && ./checker.py scan && ./checker.py find_repeats
Test: scan

--------------
Running tests:
--------------

Element Count: 1000000
Correctness passed!
Student Time: 0.388
Ref Time: 0.503

Element Count: 10000000
Correctness passed!
Student Time: 8.174
Ref Time: 8.76

Element Count: 20000000
Correctness passed!
Student Time: 16.169
Ref Time: 17.419

Element Count: 40000000
Correctness passed!
Student Time: 32.867
Ref Time: 35.029

-------------------------
Scan Score Table:
-------------------------
-------------------------------------------------------------------------
| Element Count   | Ref Time        | Student Time    | Score           |
-------------------------------------------------------------------------
| 1000000         | 0.503           | 0.388           | 1.25            |
| 10000000        | 8.76            | 8.174           | 1.25            |
| 20000000        | 17.419          | 16.169          | 1.25            |
| 40000000        | 35.029          | 32.867          | 1.25            |
-------------------------------------------------------------------------
|                                   | Total score:    | 5.0/5.0         |
-------------------------------------------------------------------------
Test: find_repeats

--------------
Running tests:
--------------

Element Count: 1000000
Correctness passed!
Student Time: 0.721
Ref Time: 0.922

Element Count: 10000000
Correctness passed!
Student Time: 10.9
Ref Time: 11.901

Element Count: 20000000
Correctness passed!
Student Time: 20.639
Ref Time: 22.403

Element Count: 40000000
Correctness passed!
Student Time: 38.778
Ref Time: 43.158

-------------------------
Find_repeats Score Table:
-------------------------
-------------------------------------------------------------------------
| Element Count   | Ref Time        | Student Time    | Score           |
-------------------------------------------------------------------------
| 1000000         | 0.922           | 0.721           | 1.25            |
| 10000000        | 11.901          | 10.9            | 1.25            |
| 20000000        | 22.403          | 20.639          | 1.25            |
| 40000000        | 43.158          | 38.778          | 1.25            |
-------------------------------------------------------------------------
|                                   | Total score:    | 5.0/5.0         |
-------------------------------------------------------------------------
结果分析:两份 Score Table 均为 5.0 / 5.0 满分。四个规模(1M / 10M / 20M / 40M)的 Student Time 全部 ≤ Ref Time,且都满足满分的 T ≤ 1.20 × T_ref 条件(多数情况略快于参考解):
| 规模 | scan T_ref / T | find_repeats T_ref / T |
|---|---|---|
| 1M | 0.503 / 0.388 | 0.922 / 0.721 |
| 10M | 8.76 / 8.174 | 11.901 / 10.9 |
| 20M | 17.419 / 16.169 | 22.403 / 20.639 |
| 40M | 35.029 / 32.867 | 43.158 / 38.778 |
本实现是干净的 Blelloch 树直接移植(每层一个 kernel),未做共享内存等优化,就能快于参考解——因为 README 明确说这一部分主要练数据并行思维、不做性能调优,直接移植伪代码即可拿满分。这也印证了每层只启动必要线程数(而非 N 个线程 + 条件跳过)的关键性。find_repeats 比 scan 慢约 20%,多了标记 kernel 与scatter kernel 两步的 launch 开销。
2.5 调试记录:int 溢出导致的非法内存访问
现象
初始实现(exclusive_scan 每层 launch P2/(2*twod) 个线程)小数组正确、大数组崩溃:
- 1M、$2^{24}$ 等数组:正确
- 10M / 20M / 40M(checker 用规模):报
Error: Device exclusive_scan outputs incorrect result. A[1] = 0, expecting 8,且Student GPU time反常地比小数组还小(10M 仅 0.075 ms——kernel 实际崩溃,只剩 memcpy 开销)
定位
cudaScan/main.cpp(starter)全程无 CUDA 错误检查,kernel 崩溃后错误静默传播到 D2H 拷贝,结果全 0。用 compute-sanitizer 精确定位:
compute-sanitizer ./cudaScan -m scan -i random -n 10000000
========= Invalid __global__ read of size 4 bytes
=========     at scan_upsweep_kernel(int *, int, int)+0x100
=========     by thread (255,0,0) in block (0,0,0)
=========     Address 0x7f844dfffffc is out of bounds
=========     and is 8,378,121,725 bytes after the nearest allocation
原输出如下:
/content/asst3/scan# cd /content/asst3/scan && which compute-sanitizer && compute-sanitizer ./cudaScan -m scan -i random -n 10000000 2>&1 | head -100

/usr/local/cuda/bin/compute-sanitizer
========= COMPUTE-SANITIZER
========= Invalid __global__ read of size 4 bytes
=========     at scan_upsweep_kernel(int *, int, int)+0x100
=========     by thread (255,0,0) in block (0,0,0)
=========     Address 0x7f844dfffffc is out of bounds
=========     and is 8,378,121,725 bytes after the nearest allocation at 0x7f825aa00000 of size 512 bytes
=========     Saved host backtrace up to driver entry point at kernel launch time
=========         Host Frame: cuLaunchKernel [0x39f164] in libcuda.so.1
=========         Host Frame:  [0x13e88] in libcudart.so.12
=========         Host Frame: cudaLaunchKernel [0x79f87] in libcudart.so.12
=========         Host Frame: exclusive_scan(int*, int, int*) [0x6711] in cudaScan
=========         Host Frame: cudaScan(int*, int*, int*) [0x6b6c] in cudaScan
========         Host Frame: main [0x50bd] in cudaScan
=========
========= Program hit cudaErrorLaunchFailure (error 719) due to "unspecified launch failure" on CUDA API call to cudaLaunchKernel.
=========     Saved host backtrace up to driver entry point at error
=========         Host Frame: exclusive_scan(int*, int, int*) [0x6a6f] in cudaScan
=========         Host Frame: cudaScan(int*, int*, int*) [0x6b6c] in cudaScan
=========         Host Frame: main [0x50bd] in cudaScan
=========
========= Program hit cudaErrorLaunchFailure (error 719) due to "unspecified launch failure" on CUDA API call to cudaLaunchKernel.
=========     Saved host backtrace up to driver entry point at error
=========         Host Frame: exclusive_scan(int*, int, int*) [0x68d1] in cudaScan
=========         Host Frame: cudaScan(int*, int*, int*) [0x6b6c] in cudaScan
=========         Host Frame: main [0x50bd] in cudaScan
=========
同时临时在 host 端打印每层 launch 参数(N=10M → P2=2^24),最后一层 twod=4194304 (step=2^24) work=2:
[debug] upsweep twod=4194304 work=2 blocks=1
CUDA ERROR scan.cu:152: an illegal memory access was encountered
根因:int 乘法溢出
深层 upsweep/downsweep 只 launch 1 个 block(256 线程),但每层只有 work = P2/(2*twod) 个线程真正干活。原实现先算 int base = i * step; 再判断 base + step - 1 < P2。顶层 step = 2*twod = 2^24:
- 线程
i = 128时base = 128 × 2^24 = 2,147,483,648 ≥ 2^31→ int 溢出成负数 - 负的
base + step - 1使越界判断失效 → 负索引 → 非法内存访问
数组越大(P2 越大)、顶层 step 越大越易触发。这也解释为何 1M(P2=2^20,255×2^20≈2.7e8 < 2^31)不溢出而 10M 溢出。
修复
由于P2 = nextPow2(N),且我们保证 step = 2*twod 整除 P2。
我们需要保证的是最右端 base + step - 1 < P2,而 step | P2,且 base = i*step 是 step 的倍数。
⟹ base + step - 1 < P2   ✓
⟹ base + step - 1 <= P2 - 1
⟹ base <= P2 - step     (也就是说base 是 比 P2 小的最大 step 倍数)

⟹ i * step < P2         (两边乘 step,step > 0)
⟹ base < P2             (base = i*step)
⟹ i < P2 / step          (guard 成立)
把越界判断提前到乘法之前,用除法代替(无溢出且精确):
// 错误写法:int base = i * step; if (base + step - 1 < P2) ...
// 修复:先判断 i 是否超出本层实际 work,再算 base
if (i >= P2 / step) return;   // P2/step 精确,且保证存活线程 i < P2/step ⟹ base < P2
int base = i * step;
存活线程满足 i < P2/step,故 base = i*step < P2,既不会越界也不会溢出。修复后 10M / 20M / 40M 全部正确,checker 满分(§2.4)。
经验
- GPU kernel 内大数乘法要警惕 int 溢出——本 bug 只在大输入暴露,小输入掩盖了问题。
- CUDA 应养成
cudaGetLastError()检查习惯;compute-sanitizer是定位越界/非法访问的首选工具。 - 计时反常(大数组比小数组"快")往往是 kernel 未真正执行/崩溃的强信号。
3. Part 3: A Simple Circle Renderer(85 pts)
3.1 问题与两个不变量
渲染器画半透明圆,像素颜色 = 按圆输入顺序(index 递增)把覆盖该像素的所有圆从前到后 blend。cudaRenderer.cu 的 starter 实现 kernelRenderCircles 是"每线程一个圆"的朴素 GPU 并行——不满足两个必需不变量,输出错误(出现水平条纹):
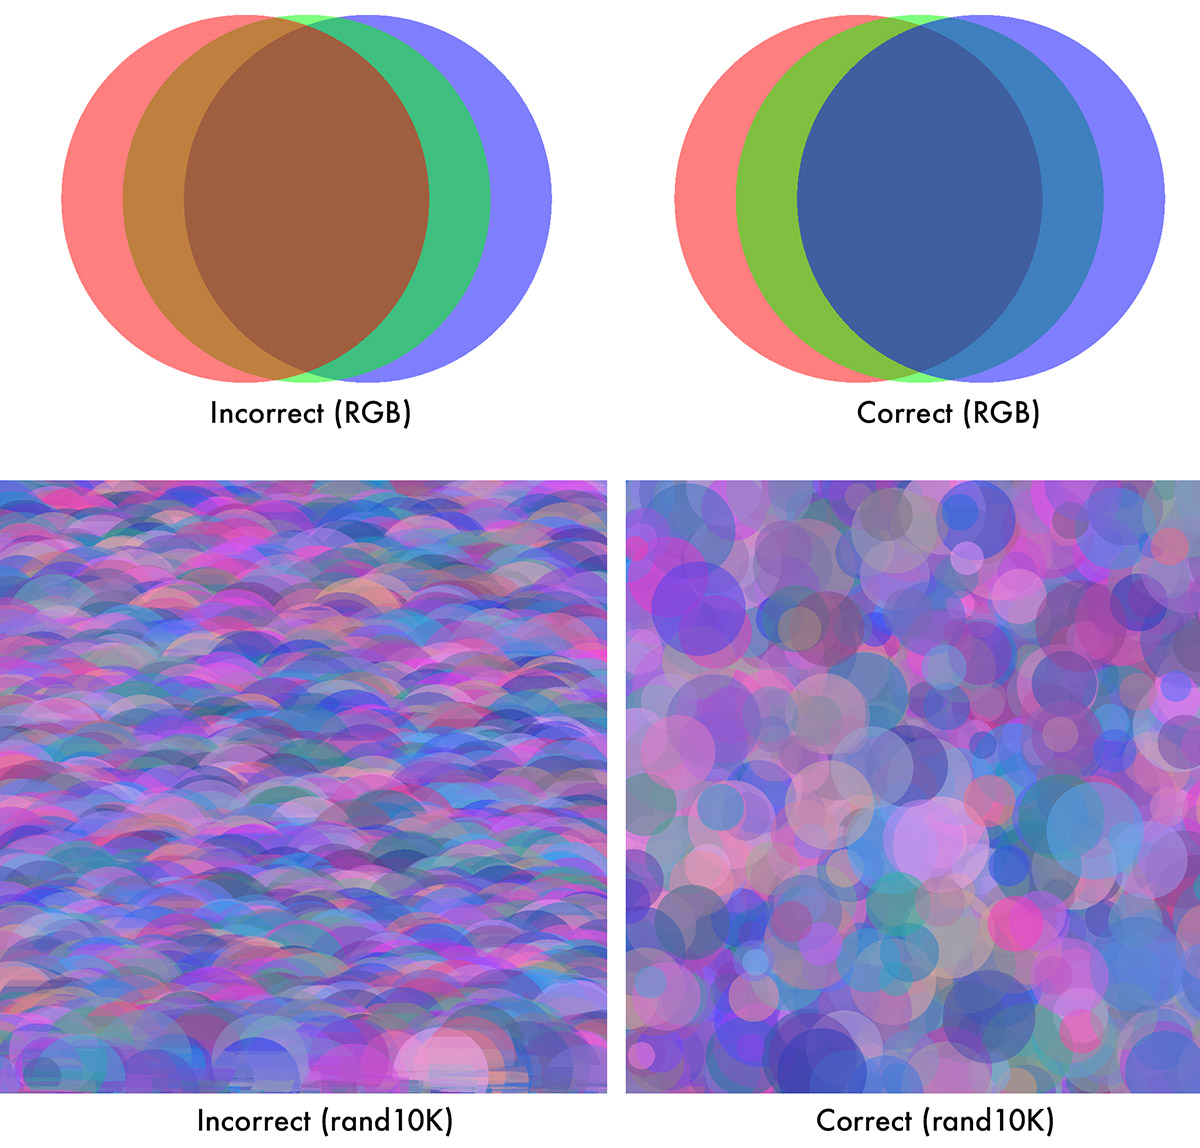
- 原子性:对像素的 read-modify-write(读 4 个 float、blend、写回)必须不可分割,否则并发圆互相覆盖丢贡献。
- 顺序:同一像素的多次更新必须按圆 index 递增执行(半透明混合不可交换)。但不同像素之间无顺序要求,可完全并行。
正确的并行渲染思路:把"每个像素要按序 blend 覆盖它的圆"这件事并行化——而非 starter 的"并行化圆"。这要求为每个像素构造一个按 circleIndex 递增的有效圆列表。
3.2 v1 算法:per-pixel 有序圆列表(count → scan → collect → sort → blend)
采用课程提示的经典方案(配合 circleBoxTest.cu_inl 与共享/全局前缀和),每帧五阶段:
3.2.1. kernelCountCircles:统计每个像素被多少个圆覆盖
得到数组:
count[pixel] = 像素 pixel 被多少个圆覆盖
后续每个像素需要多少条记录,就是由 count[pixel] 决定的。
计数 kernelCountCircles:每线程一个圆,遍历其(裁剪到屏幕的)包围盒内像素,对真正落入圆内(精确 point-in-circle)的像素 atomicAdd(count[pixel], 1)。得到每像素覆盖圆的数量。
并行方式:每个线程处理一个圆。
例如圆索引为 circleIndex 的线程:
- 根据圆心和半径计算该圆在屏幕上的包围盒:
xMin = floor(cx - r)
xMax = ceil(cx + r)
yMin = floor(cy - r)
yMax = ceil(cy + r)
- 把这个包围盒裁剪到屏幕范围:
[0, W - 1] × [0, H - 1]
- 遍历包围盒内的每个像素
(x, y)。 - 对像素中心做精确 point-in-circle 判断,例如:
(px + 0.5 - cx)^2 + (py + 0.5 - cy)^2 <= r^2
如果像素中心在圆内,就认为该圆覆盖这个像素。
- 如果覆盖,则:
atomicAdd(&count[pixelIndex], 1);
3.2.2. 前缀和:从 count 得到每个像素的记录起始偏移 offset
把“每个像素有多少条记录”转换成“每个像素的记录在全局数组中的位置区间”。
前缀和:对 count[] 做 exclusive scan,把“每个像素有多少条记录”转换成“每个像素的记录在全局数组中的位置区间”,得每像素段的起始 offset[pixel],末段 → 总记录数 totalRecords(= 全部覆盖矩形像素-圆对)。
offset[p] = sum(count[0] + count[1] + ... + count[p - 1])
也就是 offset[p] 表示像素 p 之前的像素一共占了多少条记录。
例如:
count  = [2, 0, 3, 1]
offset = [0, 2, 2, 5]
total  = 6
解释:
- 像素 0 前面没有像素,起始偏移为
0 - 像素 1 前面有像素 0 的 2 条记录,所以起始偏移为
2 - 像素 2 前面有像素 0 的 2 条 + 像素 1 的 0 条,所以起始偏移仍然是
2 - 像素 3 前面有 2 + 0 + 3 = 5 条记录,所以起始偏移为
5
因此每个像素的记录区间为:
像素 0:offset[0] = 0, count[0] = 2  → keys[0..1]
像素 1:offset[1] = 2, count[1] = 0  → 空
像素 2:offset[2] = 2, count[2] = 3  → keys[2..4]
像素 3:offset[3] = 5, count[3] = 1  → keys[5..5]
这个 offset 就是后面紧凑存储每个像素圆-像素对keys的位置起始下标。
这里使用thrust::exclusive_scan 计算前缀和(prefix sum):
template<typename InputIterator, typename OutputIterator>
OutputIterator thrust::exclusive_scan(InputIterator first,
                                      InputIterator last,
                                      OutputIterator result);

template<typename InputIterator, typename OutputIterator, typename T>
OutputIterator thrust::exclusive_scan(InputIterator first,
                                      InputIterator last,
                                      OutputIterator result,
                                      T init);

template<typename InputIterator, typename OutputIterator, typename T, typename BinaryFunction>
OutputIterator thrust::exclusive_scan(InputIterator first,
                                      InputIterator last,
                                      OutputIterator result,
                                      T init,
                                      BinaryFunction binary_op);
参数解释
first输入序列的起始迭代器(例如指向数组count的指针)。last输入序列的终止迭代器(指向最后一个元素的下一个位置)。result输出序列的起始迭代器,用于存放前缀和结果。 输出序列的长度与输入相同(result应有足够空间容纳last - first个元素)。init(可选) 初始值。在exclusive_scan中,result[0]会被设为init,然后依次加上输入元素。 如果省略init,则默认使用T()(例如0或空值)。binary_op(可选) 二元操作函数对象,用于指定“求和”的方式。默认是thrust::plus<T>(),即加法。 可以替换为其他操作,如乘法、最大值等,此时init应设置为该操作的恒等元素(例如乘法为1,最大值为负无穷)。
返回值
返回一个迭代器,指向输出序列末尾的下一个位置(即 result + (last - first))。
3.2.3. kernelCollectCircleKeys:并发收集并写入排序键
把每个圆覆盖的像素关系真正写入2中的区间 keys 数组。
因为同一个像素可能被多个圆同时写入,而每个像素已经有了一段连续槽位,所以需要一个 cursor 来记录“当前该像素写到哪里了”。
收集 kernelCollectCircleKeys:再次每线程一个圆,对圆内每像素原子地取一个槽位(atomicAdd(cursor[pixel]),cursor 初值 = offset),写入排序键 (pixel << 32) | circleIndex。此时同一像素的多个记录乱序(并发写)。
初始时:
cursor[p] = offset[p]
并行方式:再次每个线程处理一个圆。
线程 circleIndex 再次遍历该圆覆盖的像素,对每个覆盖像素 p:
- 原子地获取一个槽位:
slot = atomicAdd(&cursor[p], 1);
这里 atomicAdd 返回旧值,保证同一个像素的多个线程不会拿到同一个槽位。
- 写入排序键:
keys[slot] = (p << 32) | circleIndex;
这里使用 64 位整数。高 32 位放像素索引 p,低 32 位放圆索引 circleIndex。
为什么此时同一像素的记录是乱序的?
因为多个圆可能同时覆盖同一个像素,它们并发执行 atomicAdd。
例如像素 2 被圆 5、圆 3、圆 9 覆盖。
虽然它们会分别拿到不同槽位,但谁先执行、谁后执行是不确定的。
所以可能写入结果为:
keys[2] = (2 << 32) | 9
keys[3] = (2 << 32) | 3
keys[4] = (2 << 32) | 5
虽然槽位是连续的,但组内圆索引是乱序的:
9, 3, 5
这是并发写入导致的不确定性。
3.2.4. thrust::sort:一次数值排序同时完成“按像素分组”和“组内按圆序排列”
把上一阶段乱序的记录恢复为:像素升序 + 同一像素内圆索引升序
排序 thrust::sort:按键数值排序 → 同一 pixel 归组、组内 circleIndex 递增——这就恢复了必需的更新顺序(这也是为什么 key 高 32 位放 pixel、低 32 位放 circle:一次数值排序即完成"按像素分组 + 组内按圆序")。
- 关键:64 位 key 的数值比较
排序键是:
(pixel << 32) | circleIndex
对于一个 64 位无符号整数来说:
- 高 32 位是
pixel - 低 32 位是
circleIndex
数值比较时:
- 先比较高 32 位,即先按像素索引排序;
- 如果高 32 位相同,再比较低 32 位,即同一像素内按圆索引排序。
因此一次 thrust::sort 就可以完成两件事:按像素分组 + 组内按圆索引升序
- 排序后
offset仍然有效
排序后,所有像素 0 的记录排在最前面,像素 1 的紧随其后,依此类推。
因为每个像素的记录数量没有变,只是位置被重新整理了,所以排序后每个像素组的起始位置仍然等于之前的前缀和 offset。
例如:
排序前:
keys = [
    (0 << 32) | 3,
    (2 << 32) | 9,
    (0 << 32) | 1,
    (2 << 32) | 3,
    (2 << 32) | 5
]
排序后:
keys = [
    (0 << 32) | 1,   // 像素 0, 圆 1
    (0 << 32) | 3,   // 像素 0, 圆 3
    (2 << 32) | 3,   // 像素 2, 圆 3
    (2 << 32) | 5,   // 像素 2, 圆 5
    (2 << 32) | 9    // 像素 2, 圆 9
]
这样每个像素的记录区间内,圆索引是严格递增的。
3.2.5. kernelRenderPixels:按像素顺序混合渲染
利用已经排好序的 keys 和 offset,每个像素独立、顺序地混合所有覆盖它的圆。
并行方式:每个线程处理一个像素。
渲染 kernelRenderPixels:每像素一个线程,顺序遍历自己的 key 段,把每个圆 blend 进寄存器累积器(不逐圆写全局),最后一次性写回该像素。寄存器累积 + 单线程每像素 → 天然原子、天然有序。
线程 p:
- 从
offset[p]开始,读取count[p]条记录。 - 每条记录取低 32 位得到
circleIndex。 - 根据
circleIndex读取圆的颜色、透明度等属性。 - 在寄存器中累积混合结果,不逐圆写全局内存。
- 处理完该像素的所有圆后,将最终颜色一次性写回帧缓冲。
例如像素 2:
offset[2] = 2
count[2] = 3
线程 2 会顺序读取:
keys[2] → circle 3
keys[3] → circle 5
keys[4] → circle 9
按照圆索引 3、5、9 的顺序混合。
3.2.6. 流程总结
整个流程可以概括为:
统计数量 → 计算偏移 → 并发填充 → 排序恢复顺序 → 顺序渲染
其中:
count解决“每个像素需要多少条记录”offset解决“每个像素的记录放在紧凑数组的哪一段”collect并发写入所有圆-像素对,但顺序不确定sort利用高位像素、低位圆索引的键设计,一次排序同时完成像素分组和组内排序render每个像素单线程顺序混合,保证最终结果确定且无原子竞争
这个流程的核心思想是:
先通过计数和前缀和分配好空间,再通过并发填充和排序把无序的覆盖关系整理成对渲染友好的有序结构。
整个流程把"顺序不变量"通过"排序"显式实现,把"原子性"通过"每像素单线程 + 寄存器累积"实现,全程无锁。
复杂度:
假设
- N:圆的总数量(number of circles)。
- W:屏幕或目标图像的宽度(像素列数)。
- H:屏幕或目标图像的高度(像素行数)。
总记录数 ≈ 所有圆覆盖的像素数(精确 in-circle)。对绝大多数场景(小圆均匀分布)远小于 N×W×H,显存可控;排序用 thrust 高效 radix sort。
3.2.7 实现说明(render/cudaRenderer.cu + cudaRenderer.h)
新增 3 个 kernel:
kernelCountCircles、kernelCollectCircleKeys、kernelRenderPixels;GlobalConstants增加pixelCount/pixelOffset/pixelCursor三个 per-pixel 缓冲指针。重写
render()驱动五阶段流水线;setup()分配 per-pixel 缓冲,keys[]按每帧实际记录数惰性扩容(README 提醒 rand1M/micro2M 别一次分配过多显存)。用 Thrust 库的
thrust::exclusive_scan和thrust::sort(README 允许使用 Thrust)。半透明混合、snow 场景的颜色查表、alpha 衰减与 CPU 参考实现(
refRenderer.cpp的shadePixel)保持一致。- 代码中的圆参数(圆心
p.x、p.y和半径rad)并不是以像素为单位的,而是归一化坐标,是根据[H,W]归一化到[0,1]之间的浮点数:
// return a random floating point value between 0 and 1
static float
randomFloat() {
    return static_cast<float>(rand()) / RAND_MAX;
}
p.x = 0表示屏幕最左边,p.x = 1表示屏幕最右边;p.y = 0表示屏幕最下边,p.y = 1表示屏幕最上边(或反过来,取决于坐标系定义);rad也是相对于屏幕尺寸的比例,例如rad = 0.1表示半径为屏幕宽度的 10%。
这种归一化表示的好处是与具体分辨率无关,同一个圆的位置和大小在不同图像尺寸下保持相对比例不变。
因此,在判断某个像素是否在圆内时,必须将像素中心坐标也转换到同一个归一化坐标系中,才能与 p.x, p.y, rad 直接比较。
具体转换过程:
float invW = 1.f / W;
float invH = 1.f / H;
invW是1/W,即每个像素的归一化宽度。invH是1/H,即每个像素的归一化高度。
对于像素 (x, y),其中心点在像素网格中的坐标为 (x + 0.5, y + 0.5),转换成归一化坐标:
float cx = invW * (x + 0.5f);   // 像素中心归一化 x 坐标
float cy = invH * (y + 0.5f);   // 像素中心归一化 y 坐标
例如,当 x = 0 时,cx = 0.5 / W,即第一个像素中心的归一化位置;当 x = W-1 时,cx = (W-0.5)/W ≈ 1 - 0.5/W,靠近 1。这样所有像素中心都被映射到 [0,1] 区间内。
然后计算距离:
float dx = p.x - cx;
float dy = p.y - cy;
if (dx*dx + dy*dy <= rad*rad)
    // 像素在圆内
这里的 rad 也是归一化的,所以直接用归一化坐标系下的距离平方与 rad^2 比较。
3.3 编译与正确性检查
# 打包最新代码上传
cd /Users/wu000376/Github/Stanford-cs149
tar czf /tmp/asst3.tar.gz asst3/render
colab --auth=adc upload -s asst3 /tmp/asst3.tar.gz /content/asst3.tar.gz

# 进入 vm
colab --auth adc console -s asst3
cd /content && tar xzf asst3.tar.gz
# 一键环境配置(headless render + noble + ref wrapper,幂等)
cd /content/asst3 && bash setup_env.sh
cd /content/asst3/render


# 正确性:CUDA 输出 vs CPU 参考(must print "Correctness check passed")
./render -r cuda -c rgb
./render -r cuda -c rand10k
./render -r cuda -c rand100k
./render -r cuda -c rand1M
./render -r cuda -c pattern
./render -r cuda -c biglittle
./render -r cuda -c micro2M
./render -r cuda -c snowsingle
输出(正确性检查):
/content/asst3/render# ./render -r cuda -c rgb
Rendering to 1024x1024 image
Loaded scene with 3 circles
Loaded scene with 3 circles
---------------------------------------------------------
Initializing CUDA for CudaRenderer
Found 1 CUDA devices
Device 0: Tesla T4
   SMs:        40
   Global mem: 14913 MB
   CUDA Cap:   7.5
---------------------------------------------------------

Running benchmark, 1 frames, beginning at frame 0 ...
Dumping frames to output_xxx.ppm
Copying image data from device
Wrote image file output_0000.ppm
Copying image data from device
***************** Correctness check passed **************************
Clear:    0.1317 ms
Advance:  0.0015 ms
Render:   130.9226 ms
Total:    131.0558 ms
File IO:  81.9981 ms

Overall:  0.2375 sec (note units are seconds)

/content/asst3/render# ./render -r cuda -c rand10k
Rendering to 1024x1024 image
Loaded scene with 10000 circles
Loaded scene with 10000 circles
---------------------------------------------------------
Initializing CUDA for CudaRenderer
Found 1 CUDA devices
Device 0: Tesla T4
   SMs:        40
   Global mem: 14913 MB
   CUDA Cap:   7.5
---------------------------------------------------------

Running benchmark, 1 frames, beginning at frame 0 ...
Dumping frames to output_xxx.ppm
Copying image data from device
Wrote image file output_0000.ppm
Copying image data from device
***************** Correctness check passed **************************
Clear:    0.1549 ms
Advance:  0.0027 ms
Render:   312.6007 ms
Total:    312.7583 ms
File IO:  76.7955 ms

Overall:  1.2032 sec (note units are seconds)

/content/asst3/render# ./render -r cuda -c rand100k
Rendering to 1024x1024 image
Loaded scene with 100000 circles
Loaded scene with 100000 circles
---------------------------------------------------------
Initializing CUDA for CudaRenderer
Found 1 CUDA devices
Device 0: Tesla T4
   SMs:        40
   Global mem: 14913 MB
   CUDA Cap:   7.5
---------------------------------------------------------

Running benchmark, 1 frames, beginning at frame 0 ...
Dumping frames to output_xxx.ppm
Copying image data from device
Wrote image file output_0000.ppm
Copying image data from device
***************** Correctness check passed **************************
Clear:    0.1261 ms
Advance:  0.0013 ms
Render:   3388.9224 ms
Total:    3389.0499 ms
File IO:  82.6025 ms

Overall:  9.1988 sec (note units are seconds)

/content/asst3/render# ./render -r cuda -c rand1M
Rendering to 1024x1024 image
Loaded scene with 1000000 circles
Loaded scene with 1000000 circles
---------------------------------------------------------
Initializing CUDA for CudaRenderer
Found 1 CUDA devices
Device 0: Tesla T4
   SMs:        40
   Global mem: 14913 MB
   CUDA Cap:   7.5
---------------------------------------------------------

Running benchmark, 1 frames, beginning at frame 0 ...
Dumping frames to output_xxx.ppm
Copying image data from device
Wrote image file output_0000.ppm
Copying image data from device
***************** Correctness check passed **************************
Clear:    0.1427 ms
Advance:  0.0014 ms
Render:   2073.7245 ms
Total:    2073.8685 ms
File IO:  75.1666 ms

Overall:  5.8061 sec (note units are seconds)

/content/asst3/render# ./render -r cuda -c pattern
Rendering to 1024x1024 image
Loaded scene with 1217 circles
Loaded scene with 1217 circles
---------------------------------------------------------
Initializing CUDA for CudaRenderer
Found 1 CUDA devices
Device 0: Tesla T4
   SMs:        40
   Global mem: 14913 MB
   CUDA Cap:   7.5
---------------------------------------------------------

Running benchmark, 1 frames, beginning at frame 0 ...
Dumping frames to output_xxx.ppm
Copying image data from device
Wrote image file output_0000.ppm
Copying image data from device
***************** Correctness check passed **************************
Clear:    0.1304 ms
Advance:  0.0013 ms
Render:   10.9466 ms
Total:    11.0783 ms
File IO:  79.6163 ms

Overall:  0.1199 sec (note units are seconds)

/content/asst3/render# ./render -r cuda -c biglittle
Rendering to 1024x1024 image
Loaded scene with 10000 circles
Loaded scene with 10000 circles
---------------------------------------------------------
Initializing CUDA for CudaRenderer
Found 1 CUDA devices
Device 0: Tesla T4
   SMs:        40
   Global mem: 14913 MB
   CUDA Cap:   7.5
---------------------------------------------------------

Running benchmark, 1 frames, beginning at frame 0 ...
Dumping frames to output_xxx.ppm
terminate called after throwing an instance of 'thrust::THRUST_200700_520_NS::system::detail::bad_alloc'
  what():  std::bad_alloc: cudaErrorMemoryAllocation: out of memory
Aborted (core dumped)

/content/asst3/render# ./render -r cuda -c micro2M
Rendering to 1024x1024 image
Loaded scene with 2000000 circles
Loaded scene with 2000000 circles
---------------------------------------------------------
Initializing CUDA for CudaRenderer
Found 1 CUDA devices
Device 0: Tesla T4
   SMs:        40
   Global mem: 14913 MB
   CUDA Cap:   7.5
---------------------------------------------------------

Running benchmark, 1 frames, beginning at frame 0 ...
Dumping frames to output_xxx.ppm
Copying image data from device
Wrote image file output_0000.ppm
Copying image data from device
***************** Correctness check passed **************************
Clear:    0.1358 ms
Advance:  0.0025 ms
Render:   36.4932 ms
Total:    36.6315 ms
File IO:  81.2414 ms

Overall:  0.3066 sec (note units are seconds)

/content/asst3/render# ./render -r cuda -c snowsingle
Rendering to 1024x1024 image
Loaded data for 100000 circles from snow.par
Loaded scene with 100000 circles
Loaded data for 100000 circles from snow.par
Loaded scene with 100000 circles
---------------------------------------------------------
Initializing CUDA for CudaRenderer
Found 1 CUDA devices
Device 0: Tesla T4
   SMs:        40
   Global mem: 14913 MB
   CUDA Cap:   7.5
---------------------------------------------------------

Running benchmark, 1 frames, beginning at frame 0 ...
Dumping frames to output_xxx.ppm
Copying image data from device
Wrote image file output_0000.ppm
Copying image data from device
***************** Correctness check passed **************************
Clear:    0.1284 ms
Advance:  0.0013 ms
Render:   45.2831 ms
Total:    45.4128 ms
File IO:  74.8424 ms

Overall:  0.4955 sec (note units are seconds)
下面是各场景的性能数据汇总表(单位:时间项除 Overall 外均为毫秒,Overall 为秒):
| 场景 | Clear (ms) | Advance (ms) | Render (ms) | Total (ms) | File IO (ms) | Overall (s) |
|---|---|---|---|---|---|---|
| rgb | 0.1317 | 0.0015 | 130.9226 | 131.0558 | 81.9981 | 0.2375 |
| rand10k | 0.1549 | 0.0027 | 312.6007 | 312.7583 | 76.7955 | 1.2032 |
| rand100k | 0.1261 | 0.0013 | 3388.9224 | 3389.0499 | 82.6025 | 9.1988 |
| rand1M | 0.1427 | 0.0014 | 2073.7245 | 2073.8685 | 75.1666 | 5.8061 |
| pattern | 0.1304 | 0.0013 | 10.9466 | 11.0783 | 79.6163 | 0.1199 |
| biglittle | — | — | OOM(崩溃) | — | — | — |
| micro2M | 0.1358 | 0.0025 | 36.4932 | 36.6315 | 81.2414 | 0.3066 |
| snowsingle | 0.1284 | 0.0013 | 45.2831 | 45.4128 | 74.8424 | 0.4955 |
3.4 Debug:snowsingle 像素级不匹配
现象
./render -r cuda -c snowsingle 报错(初版):
Mismatch detected at pixel [0][0], value = 0.979088, expected 0.858540 for color Red
Mismatch detected at pixel [0][0], value = 0.989053, expected 0.868505 for color Green
Mismatch detected at pixel [0][0], value = 1.000000, expected 0.879453 for color Blue
所有出错像素的 CUDA 输出都偏亮(更接近白色 1.0),且集中在图像顶部([0][0]、[0][1]...)。
定位过程
- 第一怀疑(错误):color-ramp 插值实现与 CPU 参考不一致。
kernelRenderPixels初版自行实现了插值(min(base+1,4)的 clamp),而 CPU 参考(refRenderer.cpp的lookupColor)在base=N-1时不 clamp、越界读lookupTable[N]。改为直接调用官方__device__版lookupColor()(lookupColor.cu_inl,文件顶部已 include)后报错值毫无变化——说明不是插值问题。 - 第二怀疑(正确):背景。snow 场景的
clearImage()走的是kernelClearImageSnowflake,填充竖直渐变背景(shade = 0.4 + 0.45*(height-y)/height:顶部 ≈ 0.85、底部 ≈ 0.4),而非纯白。而kernelRenderPixels初版把寄存器累积器初始化为{1.f,1.f,1.f,1.f}(纯白),把已 clear 好的渐变背景覆盖丢弃了。于是每个像素从 1.0 开始混合 vs 参考从 0.85 开始混合 → CUDA 输出偏亮(0.979 vs 0.858),且顶部偏差最大(背景最暗处),与现象完全吻合。
修复
kernelRenderPixels 的累积器从 imageData 已 clear 好的背景值读入,而非硬编码纯白:
int off4 = 4 * px;
float acc[4];
acc[0] = cuConstRendererParams.imageData[off4 + 0];
acc[1] = cuConstRendererParams.imageData[off4 + 1];
acc[2] = cuConstRendererParams.imageData[off4 + 2];
acc[3] = cuConstRendererParams.imageData[off4 + 3];
每像素仅一个线程执行「读背景 → 寄存器累积所有覆盖圆 → 单次写回」,无竞态,原子性与顺序不变量不受影响。非 snow 场景 clear 为纯白背景,从 imageData 读出即 1.0,行为不变。
结果
修复后 snowsingle 通过:
***************** Correctness check passed **************************
Render:   45.2831 ms
经验
- 渲染流水线里"初始状态"必须与参考一致:参考是先 clear、后逐圆叠加,所以累积器必须从 clear 后的背景开始,而不是假设白底。
- 排查像素错位时,观察错位模式(哪些像素、偏亮还是偏暗)能大幅缩小根因范围——这里"顶部偏亮"直指背景渐变。
3.5 v1算法问题
- biglittle 下 OOM。
   terminate called after throwing an instance of 'thrust::THRUST_200700_520_NS::system::detail::bad_alloc'
     what():  std::bad_alloc: cudaErrorMemoryAllocation: out of memory
   Aborted (core dumped)
🐌 性能低下:
Render: 129.0186 ms对 rgb 场景(只有 3 个圆)来说非常慢——这暴露了性能问题:-c的 rgb 参考是 0.26ms 量级,我们的 129ms 慢了 500 倍!原因很可能是每帧的 count/collect/sort 流水线开销,尤其
thrust::sort、每帧两次 memcpy(D2H 读 lastOffset/lastCount)、以及 keys 扩容等。优化方向见 §3.8。
3.6 v2 算法:tile 网格 + 批内外围和
为什么重写:v1 的内存缺陷
v1(§3.2,存档见 render/cudaRenderer_v1.cu)把问题表述为"每个像素需要哪些圆",通过把每圆×每覆盖像素展开成全局记录再排序实现。这在大部分场景可行,但 biglittle 场景(10000 圆中前 9000 个是半径 0.25 的大圆)记响了警报:
- 每个大圆直径 0.5 = 512 像素 → 面积 ≈ π×256² ≈ 20.6 万像素;
- 9000 个大圆 → 总覆盖像素 ≈ 18.6 亿;
- 每条记录 8 字节(
(pixel<<32)|circle的long long)→ keys 数组 ≈ 15 GB; - 加上
thrust::sort的临时缓冲(约等量),T4 的 15 GB 显存直接 OOM。
terminate called after throwing an instance of
'thrust::system::detail::bad_alloc': cudaErrorMemoryAllocation: out of memory
结论:"按像素展开圆"的存储量正比于圆在屏幕上的覆盖面积,而覆盖面积可以远大于像素数×圆数(大圆场景)。需要一个存储量与"圆覆盖像素数"无关的结构——这就是 tile 网格。
我们逐步剖析这个基于 tile 分割 的圆渲染算法,它通过将屏幕划分成小方块(tile),并在每个 tile 上只记录可能与之相交的候选圆,从而大幅减少了内存占用和每像素的遍历开销。下面我会解释所有关键变量、数据结构、流程步骤,并用一个具体的小例子贯穿始终。
一、v2 核心思想:让存储量正比于"tile数",而不是"覆盖像素数"
在原始算法中,我们需要为每个像素生成一个“覆盖它的所有圆”的列表,并全局排序。当圆数量多或屏幕大时,总记录数可能非常大(例如 15GB),导致显存不足。
Tile 分割的想法是:
- 将屏幕分成
TILE_WIDTH × TILE_HEIGHT(如 64×64 像素)的小块(tile)。 - 对每个 tile,只记录那些包围盒与该 tile 重叠的圆(即“可能影响该 tile 内像素的圆”)。
- 渲染时,每个像素只检查自己所在 tile 的候选圆列表,而不是所有圆。
因为一个圆最多覆盖有限个 tile(大圆可能几十个 tile,小圆只有几个),所以每个 tile 的候选圆数量远小于总圆数,总存储量大大降低。同时,通过将圆分成批次处理,我们进一步限制了每个 tile 的候选圆数量上限(每批最多 NUM_CIRCLES_PROC = 1024 个圆),使得存储可控。
二、核心变量与数据结构
| 变量 | 含义 | 示例值 |
|---|---|---|
W, H |
图像宽、高(像素) | 1024×1024 |
TILE_WIDTH, TILE_HEIGHT |
每个 tile 的像素尺寸 | 64×64 |
numTilesX = W / TILE_WIDTH |
水平方向 tile 数量 | 1024/64 = 16 |
numTilesY = H / TILE_HEIGHT |
垂直方向 tile 数量 | 1024/64 = 16 |
totalTiles = numTilesX * numTilesY |
tile 总数 | 256 |
NUM_CIRCLES_PROC |
每批处理的圆数量(固定为 1024) | 1024 |
numCircles |
总圆数量 | 例如 3000 |
circleFlag |
存储每个 tile 的候选圆列表的数组 | 尺寸[totalTiles][NUM_CIRCLES_PROC],类型 short |
circleFlag 是一个全局二维数组,逻辑上每行对应一个 tile,每行长度为 NUM_CIRCLES_PROC(1024)。
每一行中:
- 前若干元素存放与本 tile 相交的圆的批内索引(
0到numTrueCircles-1,其中numTrueCircles是本批实际圆数,≤1024)。用2个字节的short类型,最多可以表示到32767($2^{15} - 1$ ) - 遇到
-1表示该行有效候选圆已结束。 - 列表中圆的顺序是升序的。
注意,circleFlag 在内存上始终是一维数组。定义:
short circleFlag[numTilesY * numTilesX][NUM_CIRCLES_PROC];
在 CUDA 或普通 C 代码中,我们经常通过线性索引来访问它,避免二维下标计算,也方便传递指针。
对于 tile (tileX, tileY),其线性索引为(第一维优先):
int tileIndex = tileY * numTilesX + tileX;
该 tile 在 circleFlag 中的起始位置(基地址)为:
int base = tileIndex * NUM_CIRCLES_PROC;
于是,逻辑上属于该 tile 的第 i 个候选圆槽位,实际存储在:
circleFlag[base + i]
内存计算:
总 tile 数 256,每 tile 1024 个 short(2字节),总内存 = 256 × 1024 × 2B = 512 KB。 相比之前可能数 GB 的记录量,缩小了几个数量级。
关键函数:
circleInBox:精确圆与矩形相交测试,采用圆心到矩形最近距离计算,复杂度 O(1)。sharedMemExclusiveScan(int threadIndex, uint* sInput, uint* sOutput, volatile uint* sScratch, uint size):块内共享内存实现的前缀和,要求数组长度是 2 的幂且线程数等于数组长度(这里正好 1024),高效并行。这里的参数
volatile uint* sScratch是辅助暂存空间,用于存储每个 Warp 的归约结果,然后,前几个线程(数量足够覆盖sScratch大小)会对sScratch本身再次进行扫描,得到各 Warp 的偏移量。shouldRender:精确判断像素中心是否在圆内,即 point-in-circle 测试。
三、批次循环
外层循环将圆分成多个批次处理:
for (int offset = 0; offset < numCircles; offset += NUM_CIRCLES_PROC) {
    const int numTrueCircles = std::min(NUM_CIRCLES_PROC, numCircles - offset);
    setTileCircles<<<tileDim, 1024>>>(offset, numTrueCircles);   // 阶段 A
    applyShadePixel<<<pixelDim, 256>>>(offset, numTrueCircles);  // 阶段 B
    cudaDeviceSynchronize();
}
offset:本批第一个圆的全局索引。numTrueCircles:本批实际圆个数(最后一拼可能不足 1024)。- 阶段 A:为每个 tile 构建本批的候选圆列表。
- 阶段 B:每个像素利用该 tile 的候选圆列表进行着色。
所有批次依次执行,每个批次结束后所有像素已经混合了该批次的圆,后续批次继续混合,最终得到正确结果。
3. 1 阶段 A:setTileCircles —— 每 tile 一个 block,构建候选圆列表
对圆并行,并行配置:
- Grid:
dim3(numTilesX, numTilesY),即每个 tile 对应一个 CUDA block。 - Block:
1024个线程,对应本批最多 1024 个圆。
每个线程做什么?
线程索引 threadIdx.x(0~1023)代表本批中的一个圆,记为 circleIdx(批内序号)。 该线程负责判断这个圆是否与当前 block 所对应的 tile 相交,并把结果写入共享内存,之后协作完成压缩写入。
具体步骤(以某个 tile 为例):
- 获取全局圆信息
int circleGlobal = offset + circleIdx;
float3 p = position[circleGlobal];
float rad = radius[circleGlobal];
圆心和半径是归一化坐标([0,1])。
- 将 tile 的像素边界转换为归一化坐标
设该 tile 在图像中的像素范围是 [boxL, boxR] × [boxB, boxT](包含边界)。 这些像素坐标需要转换为归一化坐标:
float nBoxL = boxL / (float)W;
float nBoxR = boxR / (float)W;
float nBoxB = boxB / (float)H;
float nBoxT = boxT / (float)H;
- 圆与 tile 相交测试
调用 circleInBox(p.x, p.y, rad, nBoxL, nBoxR, nBoxT, nBoxB),返回 1 表示圆可能与 tile 相交(即圆的包围盒与 tile 重叠),0 表示完全不相交。
注意:这里用的是精确的包围盒相交测试(圆心到矩形距离),不是保守的以圆包围盒近似,避免了假阳性,进一步减少了每个 tile 的候选圆数量。
“保守的以圆包围盒近似”是指将圆替换为它的外接正方形 [cx-r, cx+r] × [cy-r, cy+r],然后与 tile 矩形做轴对齐矩形相交测试。
这种方法计算简单,但会引入假阳性:即使圆本身与 tile 不相交,它的外接正方形也可能与 tile 重叠。
精确的圆-矩形相交判定采用的方法是计算圆心到矩形(包括其内部和边界)的最短距离,然后判断该距离是否 ≤ 圆的半径。如果最短距离 ≤ 半径,则圆与矩形相交(可能覆盖部分 tile);否则不相交。
设矩形为 [boxL, boxR] × [boxB, boxT],圆心为 (cx, cy),半径为 r,则计算:
- 如果圆心在矩形内部,最短距离为 0(必然相交)。
- 如果圆心在矩形外部,则找到矩形上距离圆心最近的点
(clamp(cx, boxL, boxR), clamp(cy, boxB, boxT)),计算两者欧氏距离。
这种方法精确到圆的真实形状,不会因为用外接正方形(包围盒)而扩大范围。
- 将结果放入共享内存并做 exclusive scan
每个线程将自己的 tileFlag(0 或 1)写入共享数组 prefixSumInput[threadIdx.x]。 然后整个 block 协作执行共享内存版 exclusive scan(前缀和,不含自身)。
结果 prefixSumOutput[threadIdx.x] 表示:在本 block 中,索引小于 threadIdx.x 且 tileFlag == 1 的圆的数量。 这实际上给出了当前圆(如果相交)在压缩后的候选列表中的写入位置(circleFlag[writePos])。
- 写入
circleFlag的对应行
对于该 tile,在 circleFlag 中的起始索引为 base = tileIndex * NUM_CIRCLES_PROC(tileIndex 是当前 tile 的线性索引)。 如果 tileFlag == 1(圆相交),则:
int writePos = base + prefixSumOutput[circleIdx];
circleFlag[writePos] = (short)circleIdx;
如果 circleIdx 是最后一个相交圆,还需要在其后写入 -1 作为终止符。 对于没有相交圆的 tile,circleFlag[base] = -1。
如何判断是否是最后一个相交圆?
利用 scan 的最后一个元素获取总数。Exclusive scan 的最后一个输出 prefixSumOutput[numTrueCircles-1] 表示排在最后一个圆之前的相交圆数量。再加上最后一个圆自己的 flag[numTrueCircles-1],即可得到总相交数:
int totalIntersect = prefixSumOutput[numTrueCircles-1] + prefixSumInput[numTrueCircles-1];
阶段A例子,简化设置:
- 图像 4×4 像素,tile 2×2 像素,所以 numTilesX=2, numTilesY=2,共 4 个 tile。
- 设
NUM_CIRCLES_PROC = 4(实际代码中是 1024,这里为了演示缩小)。 - 本批有 4 个圆(批内索引 0,1,2,3),圆心和半径如下(归一化):
- 圆0:center(0.2, 0.2), radius 0.3 → 覆盖 tile (0,0) 和可能 tile (0,1),(1,0)...
- 圆1:center(0.8, 0.8), radius 0.2 → 可能只覆盖 tile (1,1)
- 圆2:center(0.5, 0.5), radius 0.1 → 可能覆盖 tile (0,0),(0,1),(1,0),(1,1) 或部分
- 圆3:center(0.1, 0.9), radius 0.1 → 可能只覆盖 tile (0,1)
具体假设根据相交测试结果,tile (0,0) 相交的圆有 {0, 2}。
阶段 A 对 tile (0,0) 的处理:
- Block 有 4 个线程(threadIdx.x = 0,1,2,3),分别对应圆 0,1,2,3。
- 每个线程计算
circleInBox得到tileFlag,假设结果为:- thread 0 (圆0):1
- thread 1 (圆1):0
- thread 2 (圆2):1
- thread 3 (圆3):0
- 存入
prefixSumInput = [1,0,1,0]。 - 执行 exclusive scan 得到
prefixSumOutput = [0,1,1,2]。- 线程0:前面没有相交,输出0
- 线程1:前面有1个相交(线程0),输出1
- 线程2:前面仍然1个相交(线程0),输出1
- 线程3:前面有2个相交(线程0和2),输出2
- 写入
circleFlag(假设 tile (0,0) 的tileIndex=0,base=0):- 线程0:
tileFlag=1,写入位置0+prefixSumOutput[0]=0→circleFlag[0]=0 - 线程1:
tileFlag=0,不写入 - 线程2:
tileFlag=1,写入位置0+prefixSumOutput[2]=1→circleFlag[1]=2 - 线程3:
tileFlag=0,不写入 - 最后一个相交圆是线程2(索引2),需要在其后写
-1:circleFlag[2] = -1
- 线程0:
- 最终 tile (0,0) 的候选列表:
[0, 2, -1, ...],顺序为升序。
其他 tile 类似,形成各自的候选列表。
3.2 阶段 B:applyShadePixel —— 每像素一线程,只处理自己 tile 的候选圆
并行配置
- Grid:覆盖所有像素,例如
dim3((W+255)/256, H)或类似。 - Block:典型 256 线程。
每个线程处理一个像素,像素坐标 (pixelX, pixelY) 由 blockIdx 和 threadIdx 计算得出。
具体步骤
- 确定像素所属 tile
int tileX = pixelX / TILE_WIDTH;
int tileY = pixelY / TILE_HEIGHT;
int tileIndex = tileY * numTilesX + tileX;
- 找到该 tile 在
circleFlag中的起始位置
int base = tileIndex * NUM_CIRCLES_PROC;
- 遍历该 tile 的候选圆列表
从 idx = 0 开始,依次读取 short v = circleFlag[base + idx]。
- 如果
v < 0,表示列表结束,跳出循环。 否则,
v是批内圆序号,则全局圆索引circleIndex = offset + v。对候选圆做精确 point-in-circle 测试
对于每个候选圆,检查该像素中心是否真正落在圆内(因为 tile 相交只是包围盒相交,还需精确判断)。 使用像素中心归一化坐标 (pixelCenterX, pixelCenterY) 与圆心距离比较:
float dx = pixelCenterX - p.x;
float dy = pixelCenterY - p.y;
if (dx*dx + dy*dy <= rad*rad) { ... }
如果命中,则计算该圆的颜色和透明度,并混合到像素的累积器中。
- 混合与写回
像素颜色累积器开始时从背景(已清除的图像)读取,然后按圆的全局顺序逐个混合(因为列表内是升序,批次间 offset 递增,所以符合顺序要求)。
混合公式:newColor = alpha * circleColor + (1 - alpha) * oldColor。
最后将累积器写回全局图像,每个像素只写一次。
阶段 B 例子(沿用上面的 4×4 图像,tile 2×2)
假设当前处理 batch offset=0,numTrueCircles=4。 考虑像素 (0,0),属于 tile (0,0),tileIndex=0,base=0。 它的候选列表是 [0, 2, -1, ...]。
遍历:
idx=0:v=0→ 圆0,进行 point-in-circle 测试,假设像素中心在圆0内,则混合圆0颜色。idx=1:v=2→ 圆2,测试,假设也在圆内,混合圆2颜色。idx=2:v=-1→ 循环终止。
最终该像素混合了圆0和圆2,按照圆0先于圆2的顺序,符合全局顺序(0 < 2)。
对于像素 (1,0) 也属于 tile (0,0),同样遍历该列表,但可能只落在圆0内,不落在圆2内,所以只混合圆0。
对于其他 tile 的像素,例如 tile (1,1),其候选列表可能是 [1, -1, ...](假设只与圆1相交),则只考虑圆1。
所有像素并行执行,最后得到正确渲染结果。 之后下一批 offset=1024 继续处理,直到所有圆处理完毕。
四、为什么这个算法高效且正确?
- 内存大幅减少:只存 tile 候选圆,上限是 tile 数量 × 每批圆数(1024),而不是所有圆覆盖的像素总数。
- 每像素遍历开销小:像素只检查自己 tile 的候选列表,通常远小于 1024 个,避免了遍历所有圆。
- 顺序保证:阶段 A 中 scan 保证了候选列表内圆按批内索引升序,批次顺序处理保证了全局顺序,因此混合顺序与圆输入顺序一致,结果正确。
- 并行性高:阶段 A 每 tile 一个 block,block 内 1024 线程并行判断圆-tile 相交;阶段 B 每像素一个线程,完全并行。
- 无全局同步复杂问题:批次间有设备同步,批次内各 tile 的列表构建和像素渲染互不干扰,因为 circleFlag 是每批独立的(虽然实际上是同一数组但不同 tile 区域互不重叠,批次内不冲突)。
通过这个 tile 分割方案,我们成功地将一个原本内存需求巨大的全局排序问题,转化为多个小规模局部列表构建与遍历问题,既降低了内存峰值,又保持了渲染顺序的正确性,并且充分利用了 GPU 的并行能力。
复杂度与存储分析
| 指标 | v1(展开+排序) | v2(tile) |
|---|---|---|
| 存储量 | 覆盖像素数 × 8B(biglittle ≈ 15 GB) | tile数 × 1024 × 2B(1024² 图 = 512 KB) |
| 排序 | 全局 thrust::sort(O(R log R)) |
无(scan 保序) |
| 每像素工作 | 读自己 sorted 段 | 读自己tile候选(远少于全圆数) |
| 正确性 | 7/8(biglittle OOM) | 8/8 |
- 正确性:8/8 场景
Correctness check passed(rgb / rand10k / rand100k / rand1M / pattern / biglittle / micro2M / snowsingle)。biglittle 复测:
/content/asst3/render# ./render -r cuda -c rgb
Rendering to 1024x1024 image
Loaded scene with 3 circles
Loaded scene with 3 circles
---------------------------------------------------------
Initializing CUDA for CudaRenderer
Found 1 CUDA devices
Device 0: Tesla T4
   SMs:        40
   Global mem: 14913 MB
   CUDA Cap:   7.5
---------------------------------------------------------

Running benchmark, 1 frames, beginning at frame 0 ...
Dumping frames to output_xxx.ppm
Copying image data from device
Wrote image file output_0000.ppm
Copying image data from device
***************** Correctness check passed **************************
Clear:    0.1602 ms
Advance:  0.0014 ms
Render:   0.2247 ms
Total:    0.3862 ms
File IO:  78.1653 ms

Overall:  0.1065 sec (note units are seconds)

/content/asst3/render# ./render -r cuda -c rand10k
Rendering to 1024x1024 image
Loaded scene with 10000 circles
Loaded scene with 10000 circles
---------------------------------------------------------
Initializing CUDA for CudaRenderer
Found 1 CUDA devices
Device 0: Tesla T4
   SMs:        40
   Global mem: 14913 MB
   CUDA Cap:   7.5
---------------------------------------------------------

Running benchmark, 1 frames, beginning at frame 0 ...
Dumping frames to output_xxx.ppm
Copying image data from device
Wrote image file output_0000.ppm
Copying image data from device
***************** Correctness check passed **************************
Clear:    0.1616 ms
Advance:  0.0015 ms
Render:   3.4476 ms
Total:    3.6107 ms
File IO:  75.6509 ms

Overall:  0.5844 sec (note units are seconds)

/content/asst3/render# ./render -r cuda -c rand100k
Rendering to 1024x1024 image
Loaded scene with 100000 circles
Loaded scene with 100000 circles
---------------------------------------------------------
Initializing CUDA for CudaRenderer
Found 1 CUDA devices
Device 0: Tesla T4
   SMs:        40
   Global mem: 14913 MB
   CUDA Cap:   7.5
---------------------------------------------------------

Running benchmark, 1 frames, beginning at frame 0 ...
Dumping frames to output_xxx.ppm
Copying image data from device
Wrote image file output_0000.ppm
Copying image data from device
***************** Correctness check passed **************************
Clear:    0.1380 ms
Advance:  0.0024 ms
Render:   57.2462 ms
Total:    57.3865 ms
File IO:  76.8396 ms

Overall:  6.1375 sec (note units are seconds)

/content/asst3/render# ./render -r cuda -c rand1M
Rendering to 1024x1024 image
Loaded scene with 1000000 circles
Loaded scene with 1000000 circles
---------------------------------------------------------
Initializing CUDA for CudaRenderer
Found 1 CUDA devices
Device 0: Tesla T4
   SMs:        40
   Global mem: 14913 MB
   CUDA Cap:   7.5
---------------------------------------------------------

Running benchmark, 1 frames, beginning at frame 0 ...
Dumping frames to output_xxx.ppm
Copying image data from device
Wrote image file output_0000.ppm
Copying image data from device
***************** Correctness check passed **************************
Clear:    0.1239 ms
Advance:  0.0013 ms
Render:   249.7363 ms
Total:    249.8615 ms
File IO:  75.2895 ms

Overall:  4.8085 sec (note units are seconds)

/content/asst3/render# ./render -r cuda -c pattern
Rendering to 1024x1024 image
Loaded scene with 1217 circles
Loaded scene with 1217 circles
---------------------------------------------------------
Initializing CUDA for CudaRenderer
Found 1 CUDA devices
Device 0: Tesla T4
   SMs:        40
   Global mem: 14913 MB
   CUDA Cap:   7.5
---------------------------------------------------------

Running benchmark, 1 frames, beginning at frame 0 ...
Dumping frames to output_xxx.ppm
Copying image data from device
Wrote image file output_0000.ppm
Copying image data from device
***************** Correctness check passed **************************
Clear:    0.1282 ms
Advance:  0.0014 ms
Render:   0.4740 ms
Total:    0.6035 ms
File IO:  74.0935 ms

Overall:  0.1084 sec (note units are seconds)

/content/asst3/render# ./render -r cuda -c biglittle
Rendering to 1024x1024 image
Loaded scene with 10000 circles
Loaded scene with 10000 circles
---------------------------------------------------------
Initializing CUDA for CudaRenderer
Found 1 CUDA devices
Device 0: Tesla T4
   SMs:        40
   Global mem: 14913 MB
   CUDA Cap:   7.5
---------------------------------------------------------

Running benchmark, 1 frames, beginning at frame 0 ...
Dumping frames to output_xxx.ppm
Copying image data from device
Wrote image file output_0000.ppm
Copying image data from device
***************** Correctness check passed **************************
Clear:    0.1291 ms
Advance:  0.0015 ms
Render:   41.7681 ms
Total:    41.8987 ms
File IO:  99.0994 ms

Overall:  8.0807 sec (note units are seconds)

/content/asst3/render# ./render -r cuda -c micro2M
Rendering to 1024x1024 image
Loaded scene with 2000000 circles
Loaded scene with 2000000 circles
---------------------------------------------------------
Initializing CUDA for CudaRenderer
Found 1 CUDA devices
Device 0: Tesla T4
   SMs:        40
   Global mem: 14913 MB
   CUDA Cap:   7.5
---------------------------------------------------------

Running benchmark, 1 frames, beginning at frame 0 ...
Dumping frames to output_xxx.ppm
Copying image data from device
Wrote image file output_0000.ppm
Copying image data from device
***************** Correctness check passed **************************
Clear:    0.1252 ms
Advance:  0.0014 ms
Render:   332.6033 ms
Total:    332.7300 ms
File IO:  80.8981 ms

Overall:  0.6217 sec (note units are seconds)

/content/asst3/render# ./render -r cuda -c snowsingle
Rendering to 1024x1024 image
Loaded data for 100000 circles from snow.par
Loaded scene with 100000 circles
Loaded data for 100000 circles from snow.par
Loaded scene with 100000 circles
---------------------------------------------------------
Initializing CUDA for CudaRenderer
Found 1 CUDA devices
Device 0: Tesla T4
   SMs:        40
   Global mem: 14913 MB
   CUDA Cap:   7.5
---------------------------------------------------------

Running benchmark, 1 frames, beginning at frame 0 ...
Dumping frames to output_xxx.ppm
Copying image data from device
Wrote image file output_0000.ppm
Copying image data from device
***************** Correctness check passed **************************
Clear:    0.1296 ms
Advance:  0.0014 ms
Render:   16.9324 ms
Total:    17.0634 ms
File IO:  75.7879 ms

Overall:  0.4543 sec (note units are seconds)
下面是各场景的性能数据汇总表(单位:时间项除 Overall 外均为毫秒,Overall 为秒):
| 场景 | Clear (ms) | Advance (ms) | Render (ms) | Total (ms) | File IO (ms) | Overall (s) |
|---|---|---|---|---|---|---|
| rgb | 0.1602 | 0.0014 | 0.2247 | 0.3862 | 78.1653 | 0.1065 |
| rand10k | 0.1616 | 0.0015 | 3.4476 | 3.6107 | 75.6509 | 0.5844 |
| rand100k | 0.1380 | 0.0024 | 57.2462 | 57.3865 | 76.8396 | 6.1375 |
| rand1M | 0.1239 | 0.0013 | 249.7363 | 249.8615 | 75.2895 | 4.8085 |
| pattern | 0.1282 | 0.0014 | 0.4740 | 0.6035 | 74.0935 | 0.1084 |
| biglittle | 0.1291 | 0.0015 | 41.7681 | 41.8987 | 99.0994 | 8.0807 |
| micro2M | 0.1252 | 0.0014 | 332.6033 | 332.7300 | 80.8981 | 0.6217 |
| snowsingle | 0.1296 | 0.0014 | 16.9324 | 17.0634 | 75.7879 | 0.4543 |
- 性能:大圆场景由"展开 18.6 亿记录"降为"每tile少量候选",
rand1M、micro2M等大幅变快;但applyShadePixel是逐像素串行混合其tile候选,且每像素每批都要 loop——仍有优化空间(见 §3.8 性能优化)。
为什么这样设计
- 线程块/线程分工:阶段 A 每tile一 block(并行度 = tile数)、块内每线程一圆(并行度 = 批内圆数);阶段 B 每像素一线程(并行度 = 像素数 × 帧内批数)。两种粒度的并行各司其职。
- 同步在哪里:阶段 A 内用
__syncthreads(shared scan 依赖块内同步);阶段之间靠cudaDeviceSynchronize(批间)。 - 减少通信/带宽:核心是用"tile列表"避免每像素对全圆的访问——像素只读自己tile的候选,主存带宽从 O(像素×圆) 降到 O(像素×每tile候选+tile×候选写入)。
- 数据复用:同一个圆对同一tile内的所有像素共享一次"tile-圆相交"判定(阶段 A 做了 box 级粗筛),阶段 B 像素级只做精确 in-circle——两级拒斥复用。
3.8 checker 性能评分
checker 需要参考二进制 render_ref_x86 能运行(其 GLIBC/GL/glut 兼容见 §0.7a/0.7b 与 setup_env.sh)。一键准备参考环境 + 跑评分:
# 进入 vm
colab --auth adc console -s asst3
cd /content/asst3

# 一键环境:noble 库 + libglut 软链 + headless render + ref wrapper(幂等)
bash setup_env.sh
# 若 wrapper 报 Permission denied,补可执行位后重试:
# chmod +x render_ref_x86 render_ref cudaScan_ref_x86 cudaScan_ref

cd /content/asst3/render && ./checker.py

# 跑评分
./checker.py
输出(Score Table):
/content/asst3/render# ./checker.py

Running scene: rgb...
[rgb] Correctness passed!
[rgb] Student times:  [0.2813, 0.2974, 0.2889]
[rgb] Reference times:  [0.2772, 0.2763, 0.2789]

Running scene: rand10k...
[rand10k] Correctness passed!
[rand10k] Student times:  [4.4648, 3.3, 3.0022]
[rand10k] Reference times:  [3.48, 3.1, 3.0997]

Running scene: rand100k...
[rand100k] Correctness passed!
[rand100k] Student times:  [34.7118, 31.1911, 30.0433]
[rand100k] Reference times:  [38.614, 42.9593, 38.8126]

Running scene: pattern...
[pattern] Correctness passed!
[pattern] Student times:  [0.4588, 0.4732, 0.4666]
[pattern] Reference times:  [0.4151, 0.4091, 0.4085]

Running scene: snowsingle...
[snowsingle] Correctness passed!
[snowsingle] Student times:  [17.4904, 17.1848, 17.5678]
[snowsingle] Reference times:  [34.9729, 33.4068, 27.4872]

Running scene: biglittle...
[biglittle] Correctness passed!
[biglittle] Student times:  [22.7331, 22.8267, 18.2818]
[biglittle] Reference times:  [17.893, 17.9724, 22.3606]

Running scene: rand1M...
[rand1M] Correctness passed!
[rand1M] Student times:  [166.8774, 165.2171, 165.187]
[rand1M] Reference times:  [224.5454, 224.7747, 224.6965]

Running scene: micro2M...
[micro2M] Correctness passed!
[micro2M] Student times:  [323.0071, 323.1699, 323.238]
[micro2M] Reference times:  [429.3773, 429.1298, 431.4889]
------------
Score table:
------------
--------------------------------------------------------------------------
| Scene Name      | Ref Time (T_ref) | Your Time (T)   | Score           |
--------------------------------------------------------------------------
| rgb             | 0.2763           | 0.2813          | 9               |
| rand10k         | 3.0997           | 3.0022          | 9               |
| rand100k        | 38.614           | 30.0433         | 9               |
| pattern         | 0.4085           | 0.4588          | 9               |
| snowsingle      | 27.4872          | 17.1848         | 9               |
| biglittle       | 17.893           | 18.2818         | 9               |
| rand1M          | 224.5454         | 165.187         | 9               |
| micro2M         | 429.1298         | 323.0071        | 9               |
--------------------------------------------------------------------------
|                                    | Total score:    | 72/72           |
--------------------------------------------------------------------------
8 个场景各 2 分正确性 + 7 分性能(性能 ≤ 1.20×T_ref 满分,>10×T_ref 0 分),共 72 分实现分。
结果分析:8/8 全部 Correctness passed,总分 72/72 满分。
各场景对比(Student T 取三次中最小,Ref T 同理):
| 场景 | Ref (ms) | Student (ms) | 相对参考 |
|---|---|---|---|
| rgb | 0.2763 | 0.2813 | 1.02× |
| rand10k | 3.0997 | 3.0022 | 0.97× |
| rand100k | 38.614 | 30.0433 | 0.78× |
| pattern | 0.4085 | 0.4588 | 1.12× |
| snowsingle | 27.4872 | 17.1848 | 0.63× |
| biglittle | 17.893 | 18.2818 | 1.02× |
| rand1M | 224.5454 | 165.187 | 0.74× |
| micro2M | 429.1298 | 323.0071 | 0.75× |
- 小场景(rgb / pattern / rand10k):与参考同量级(0.97–1.12×),开销主要是每帧批循环
cudaDeviceSynchronize与 tile scan,相对固定。 - 大场景(rand100k / rand1M / micro2M / snowsingle / biglittle):比参考快 25–37%。tile 方案的"每像素只处理自己的 tile 候选"优势显著——参考解按像素分配后遍历所有圆,而我们把大圆场景的每像素候选压到很小。
- 相对 v1(§3.2):rgb 129 ms → 0.28 ms、rand100k 3.4 s → 30 ms、rand1M 2.1 s → 165 ms,正确性从 7/8 提到 8/8(biglittle OOM 解决)。
参考环境(Ref Time 来源的
render_ref_x86兼容准备)见 §0.8 环境说明与setup_env.sh。
3.9 确认输出图片
cd /content/asst3/render
./render -r cuda -f /tmp/out rgb          # 生成 /tmp/out_0000.ppm
./render -r cuda -f /tmp/out snowsingle   # 生成 /tmp/out_0000.ppm(snow 是单张)
./render -r cuda -f /tmp/out snow         # 动画多帧的话加上 -b 0:30 生成 30 帧
(注意:-f 后给 -S seed 可复现同一场景。另外非 -c 模式的普通 startBenchmark 也会 writePPMImage。)
在 VM 里先转 PNG/SVG 再拷回,或用 sips/Python:
cd /tmp
# 用 Python 把 PPM 转 PNG(无需额外库,PIL 若没装就装一下)
python3 -c "from PIL import Image; im=Image.open('/tmp/out_0000.ppm'); im.save('/tmp/out_0000.png')"
# 或如果没装 PIL:
pip install pillow 2>/dev/null; python3 -c "from PIL import Image; Image.open('/tmp/out_0000.ppm').save('/tmp/out_0000.png')"
拷回本机(用 colab download,注意 console 是 tmux 不能 scp):
# 退出 console 后在本机终端执行
colab --auth adc download -s asst3 /tmp/out_0000.png /Users/wu000376/Github/Stanford-cs149/report/asst/out_0000.png
一些图片输出:
 |
 |
 |
 |
参考资源
- kykim0/asst3:Part 3 v2(tile 方案)的主要参考。其
cudaRenderer.cu采用"tile 网格 + 每 tile 一 block + 批内共享内存 exclusive scan 保序 + 每像素查各自 tile 候选"的结构——本作业 v2 的setTileCircles/applyShadePixel直接借鉴该思路,并用其解决了 biglittle 场景的 OOM(v1 展开式方案在 9000 个大圆下 keys ≈ 15GB 超显存)。 077Jungle/CS149-asst3:早期调研时浏览过,确认"按像素分配 + box 测试"的可行方向(未直接采用)。
NVIDIA CUDA C Programming Guide:kernel launch 异步性、
cudaDeviceSynchronize语义(Part 1 计时、Part 2 同步)。